EmailGPT

Your first day with EmailGPT

A familiar inbox.
A little guidance.

Read in your language, get to the point, and write your next reply. See how it works, then follow along in your own inbox.

Prefer to read? Follow the steps below
Connect your mailbox10 chapters · 2 min 22 sec
EmailGPT inbox overview
01 / 10

Choose Microsoft or Google, or choose Sign in with IMAP for any other provider.

0:002:22

Real app screens with fictional demonstration data. No audio. Pause or choose a chapter at any time.

Keep this page beside your inbox

Take it one step at a time.

These instructions are for the Windows desktop app. Button availability can depend on your mailbox, plan and connection.

01

Connect your mailbox

  1. Download EmailGPT from the official website and open the app.
  2. For a Microsoft or Google mailbox, choose Sign in with Microsoft or Sign in with Google and finish the provider's browser sign-in.
  3. For any other provider, choose Sign in with IMAP, enter your email and password, then select Sign in. Some providers need an app password. See the form.
  4. Let the first sync finish. Add another mailbox later in Settings → Accounts → Add account.

Each mailbox has its own folders and AI access. Google automatic AI starts off; review the account's consent settings before enabling it.
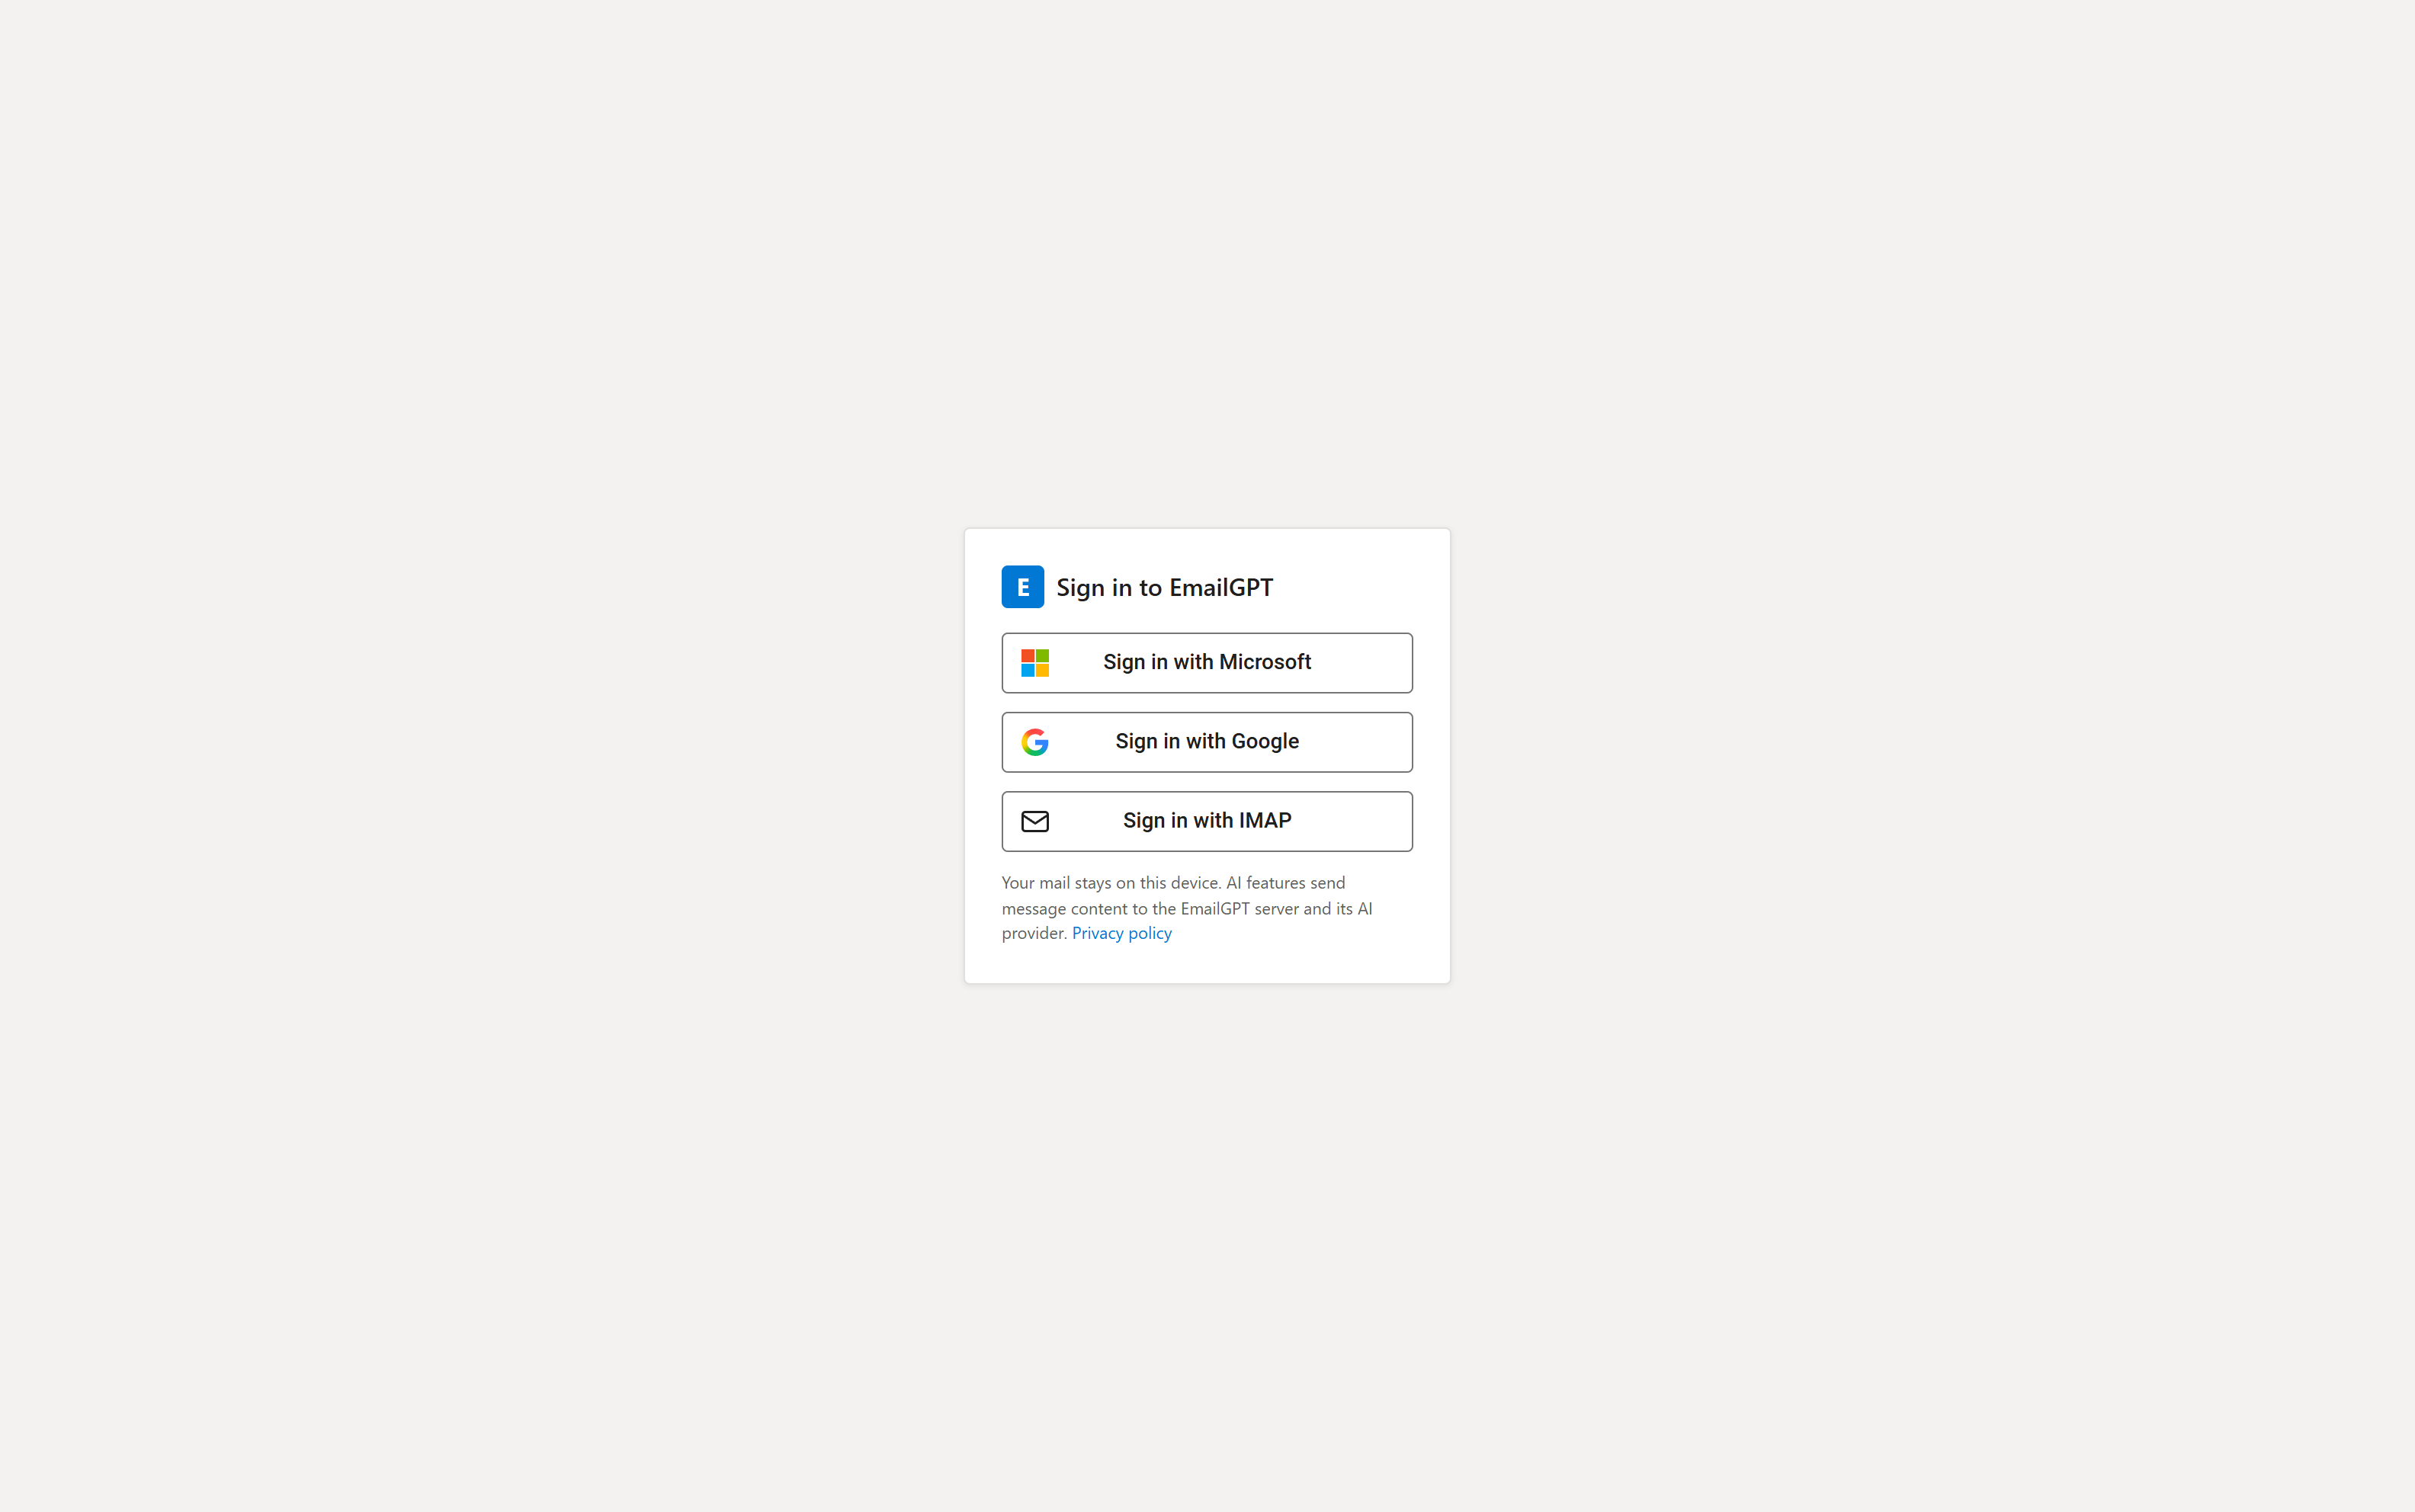
The desktop sign-in screen with three sign-in methods
Choose the sign-in method that matches your provider.
02

Make yourself at home

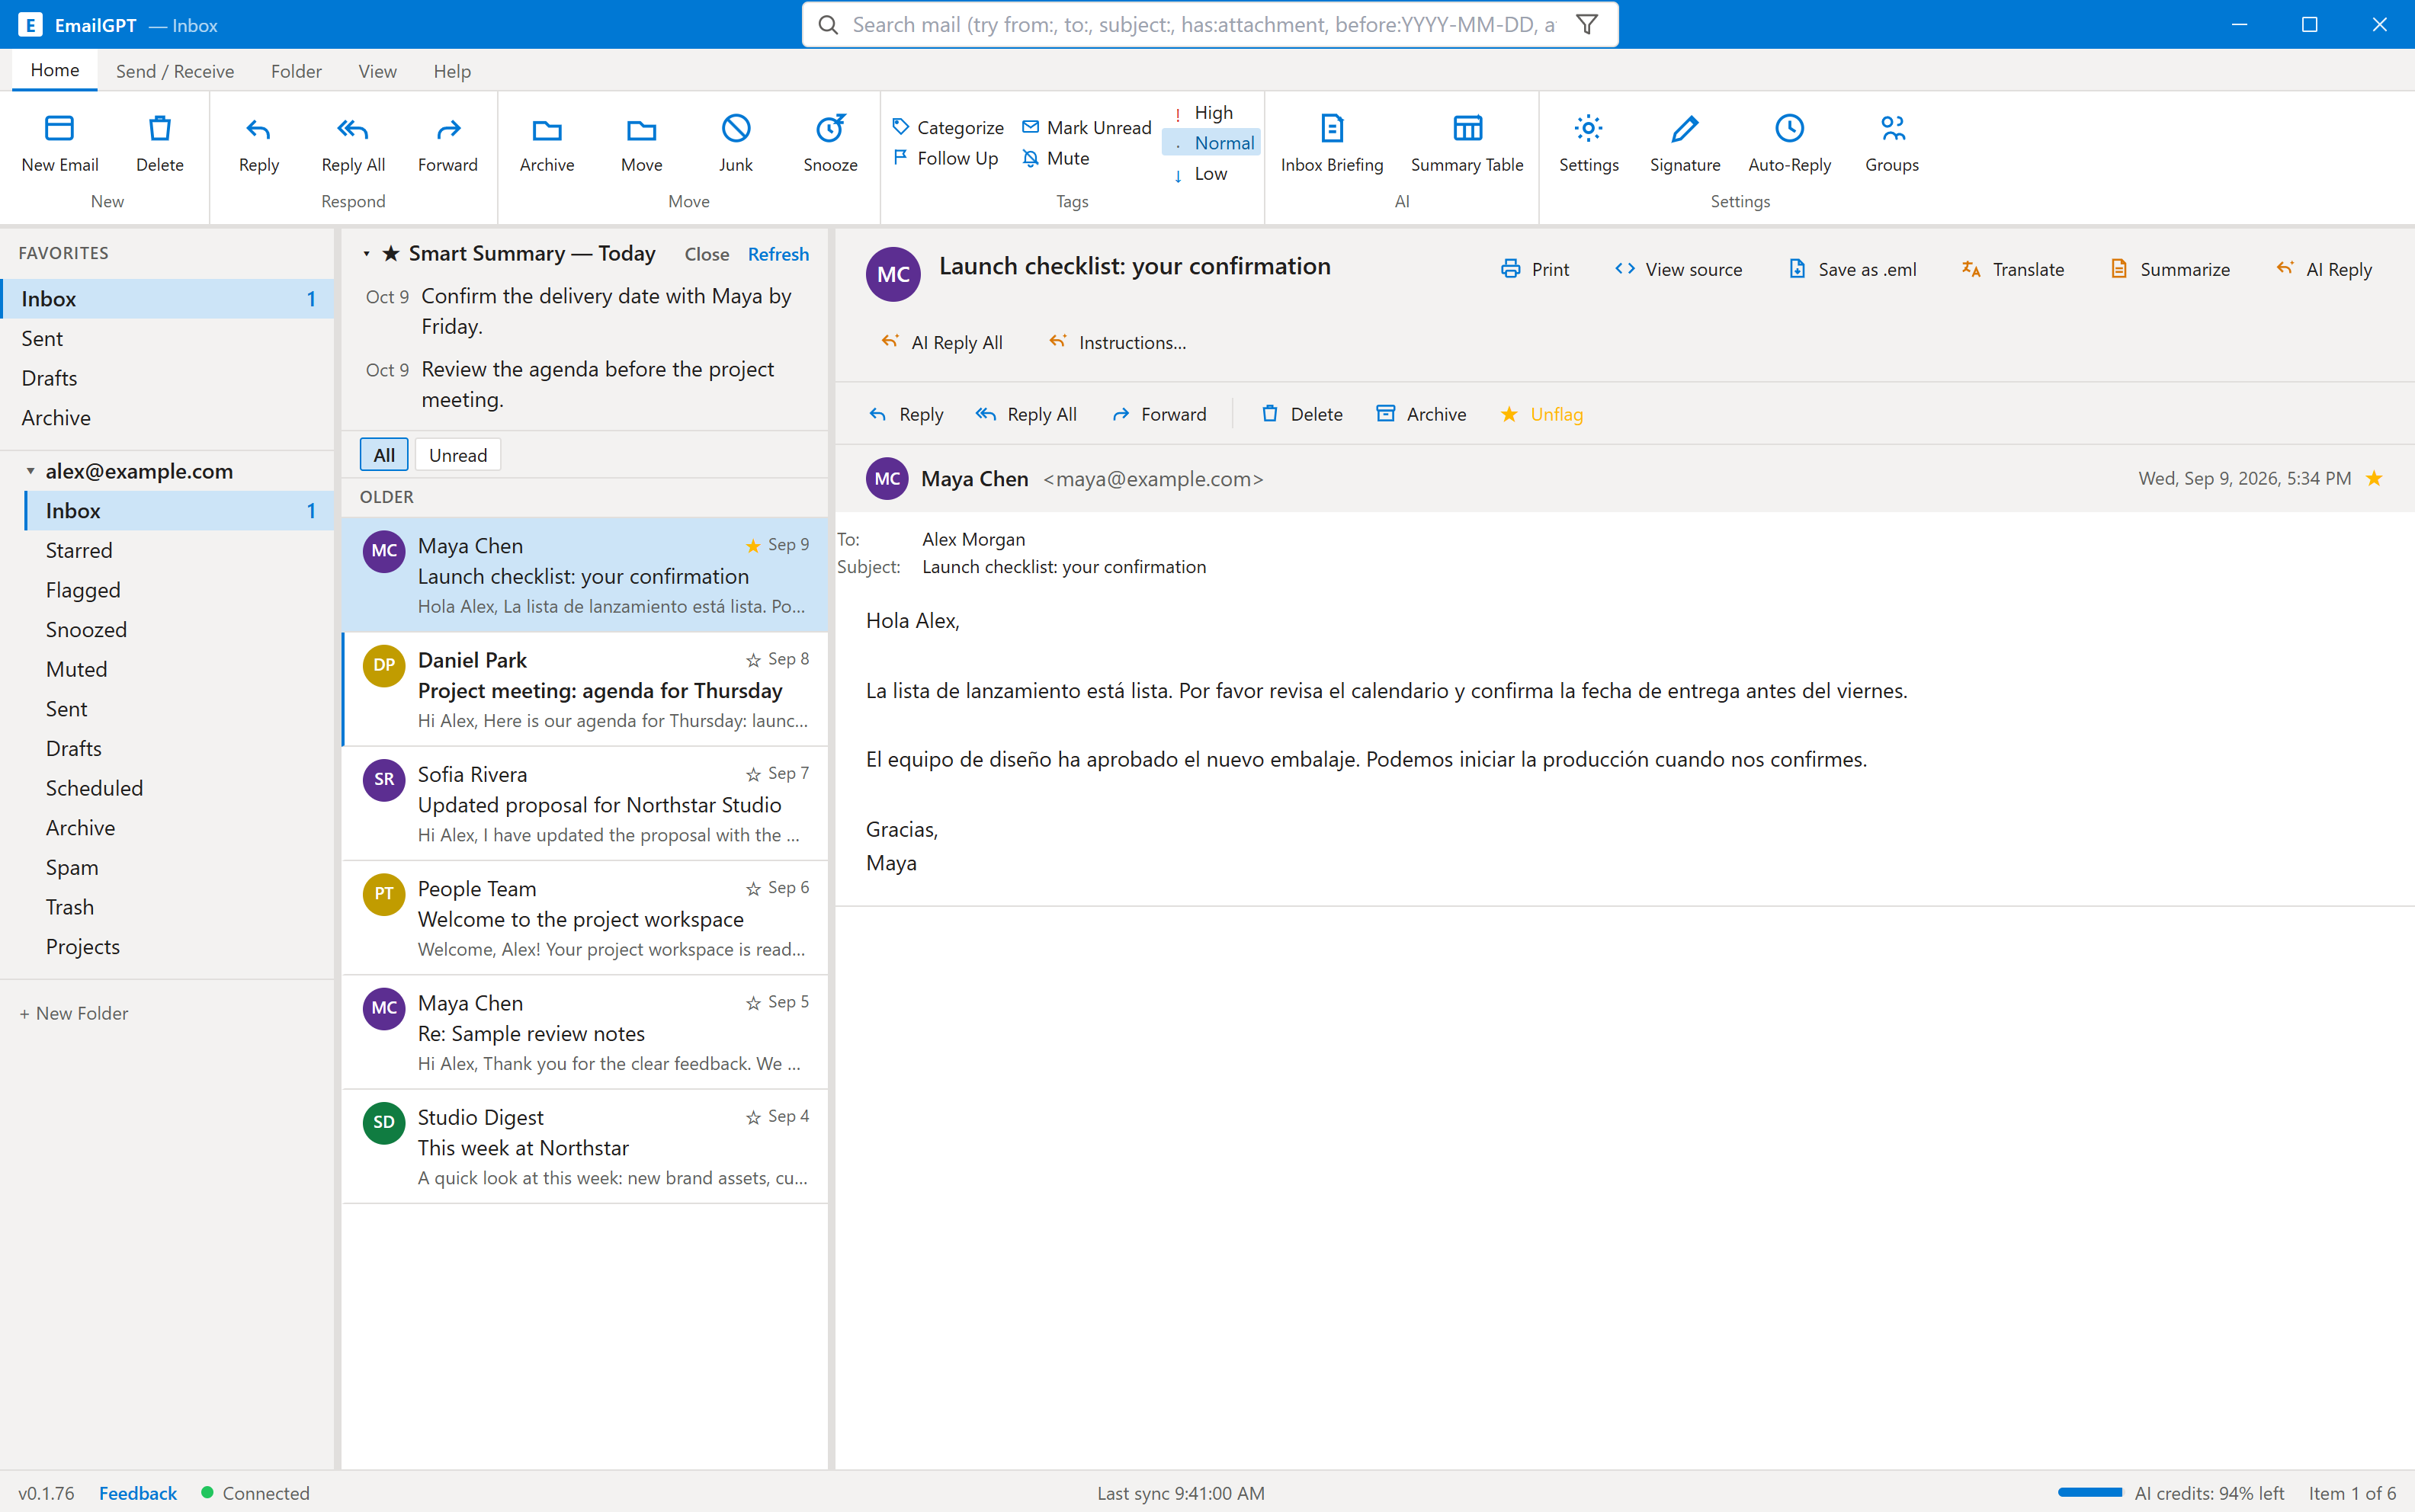
  1. Pick a mailbox and folder on the left.
  2. Select an email in the middle to read it on the right.
  3. Use Reply, Reply All or Forward for the selected message.
  4. Use New Email for a fresh message. The View tab changes layout, density and theme.

Flag a message for follow-up, move it to a folder, or use Archive to clear your inbox without deleting it.

EmailGPT inbox with folders, six fictional emails and a message in the reading pane
Your folders, message list and reading pane stay side by side.
03

Read in your language

  1. Set your preferred language in Settings → AI language.
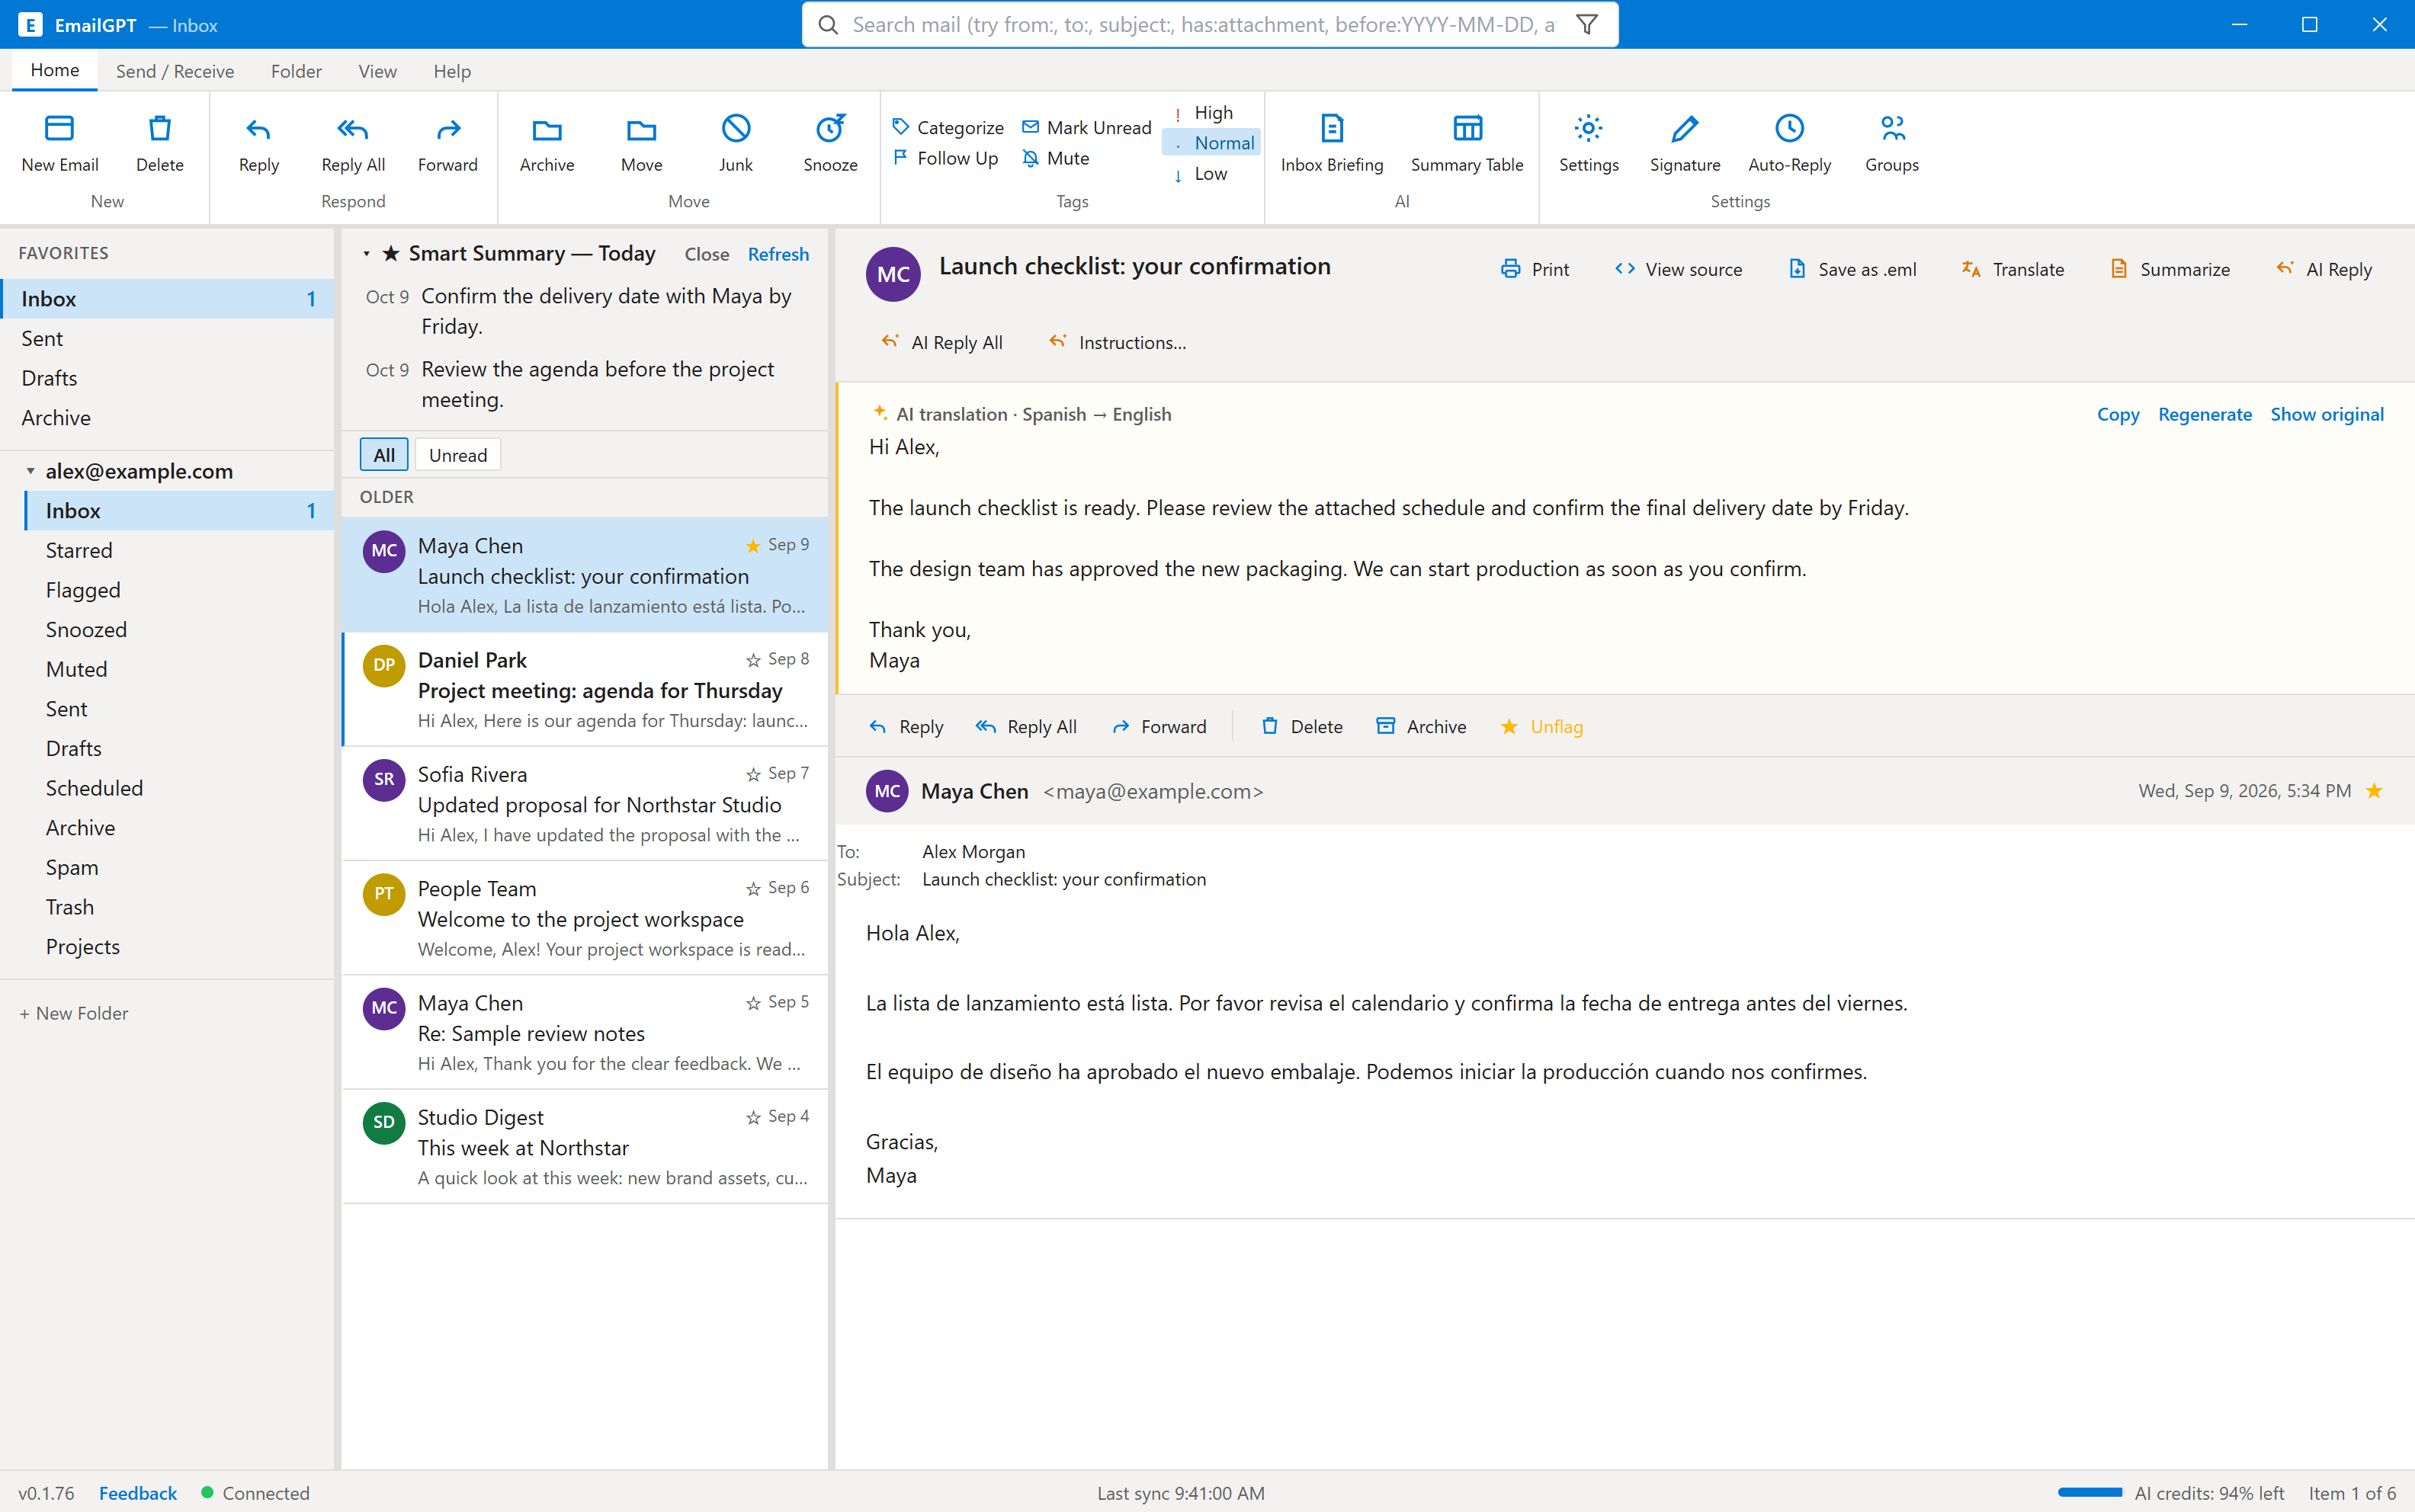
  2. Open a message and select Translate.
  3. Read the translation above the message. Use Show original to compare, or Copy to reuse the text.

The original message is preserved. AI actions use your allowance; check important details such as names, dates and amounts.

A Spanish demonstration message translated into English above its original text
The translation and original stay available in the same reading pane.
04

Get to the important part

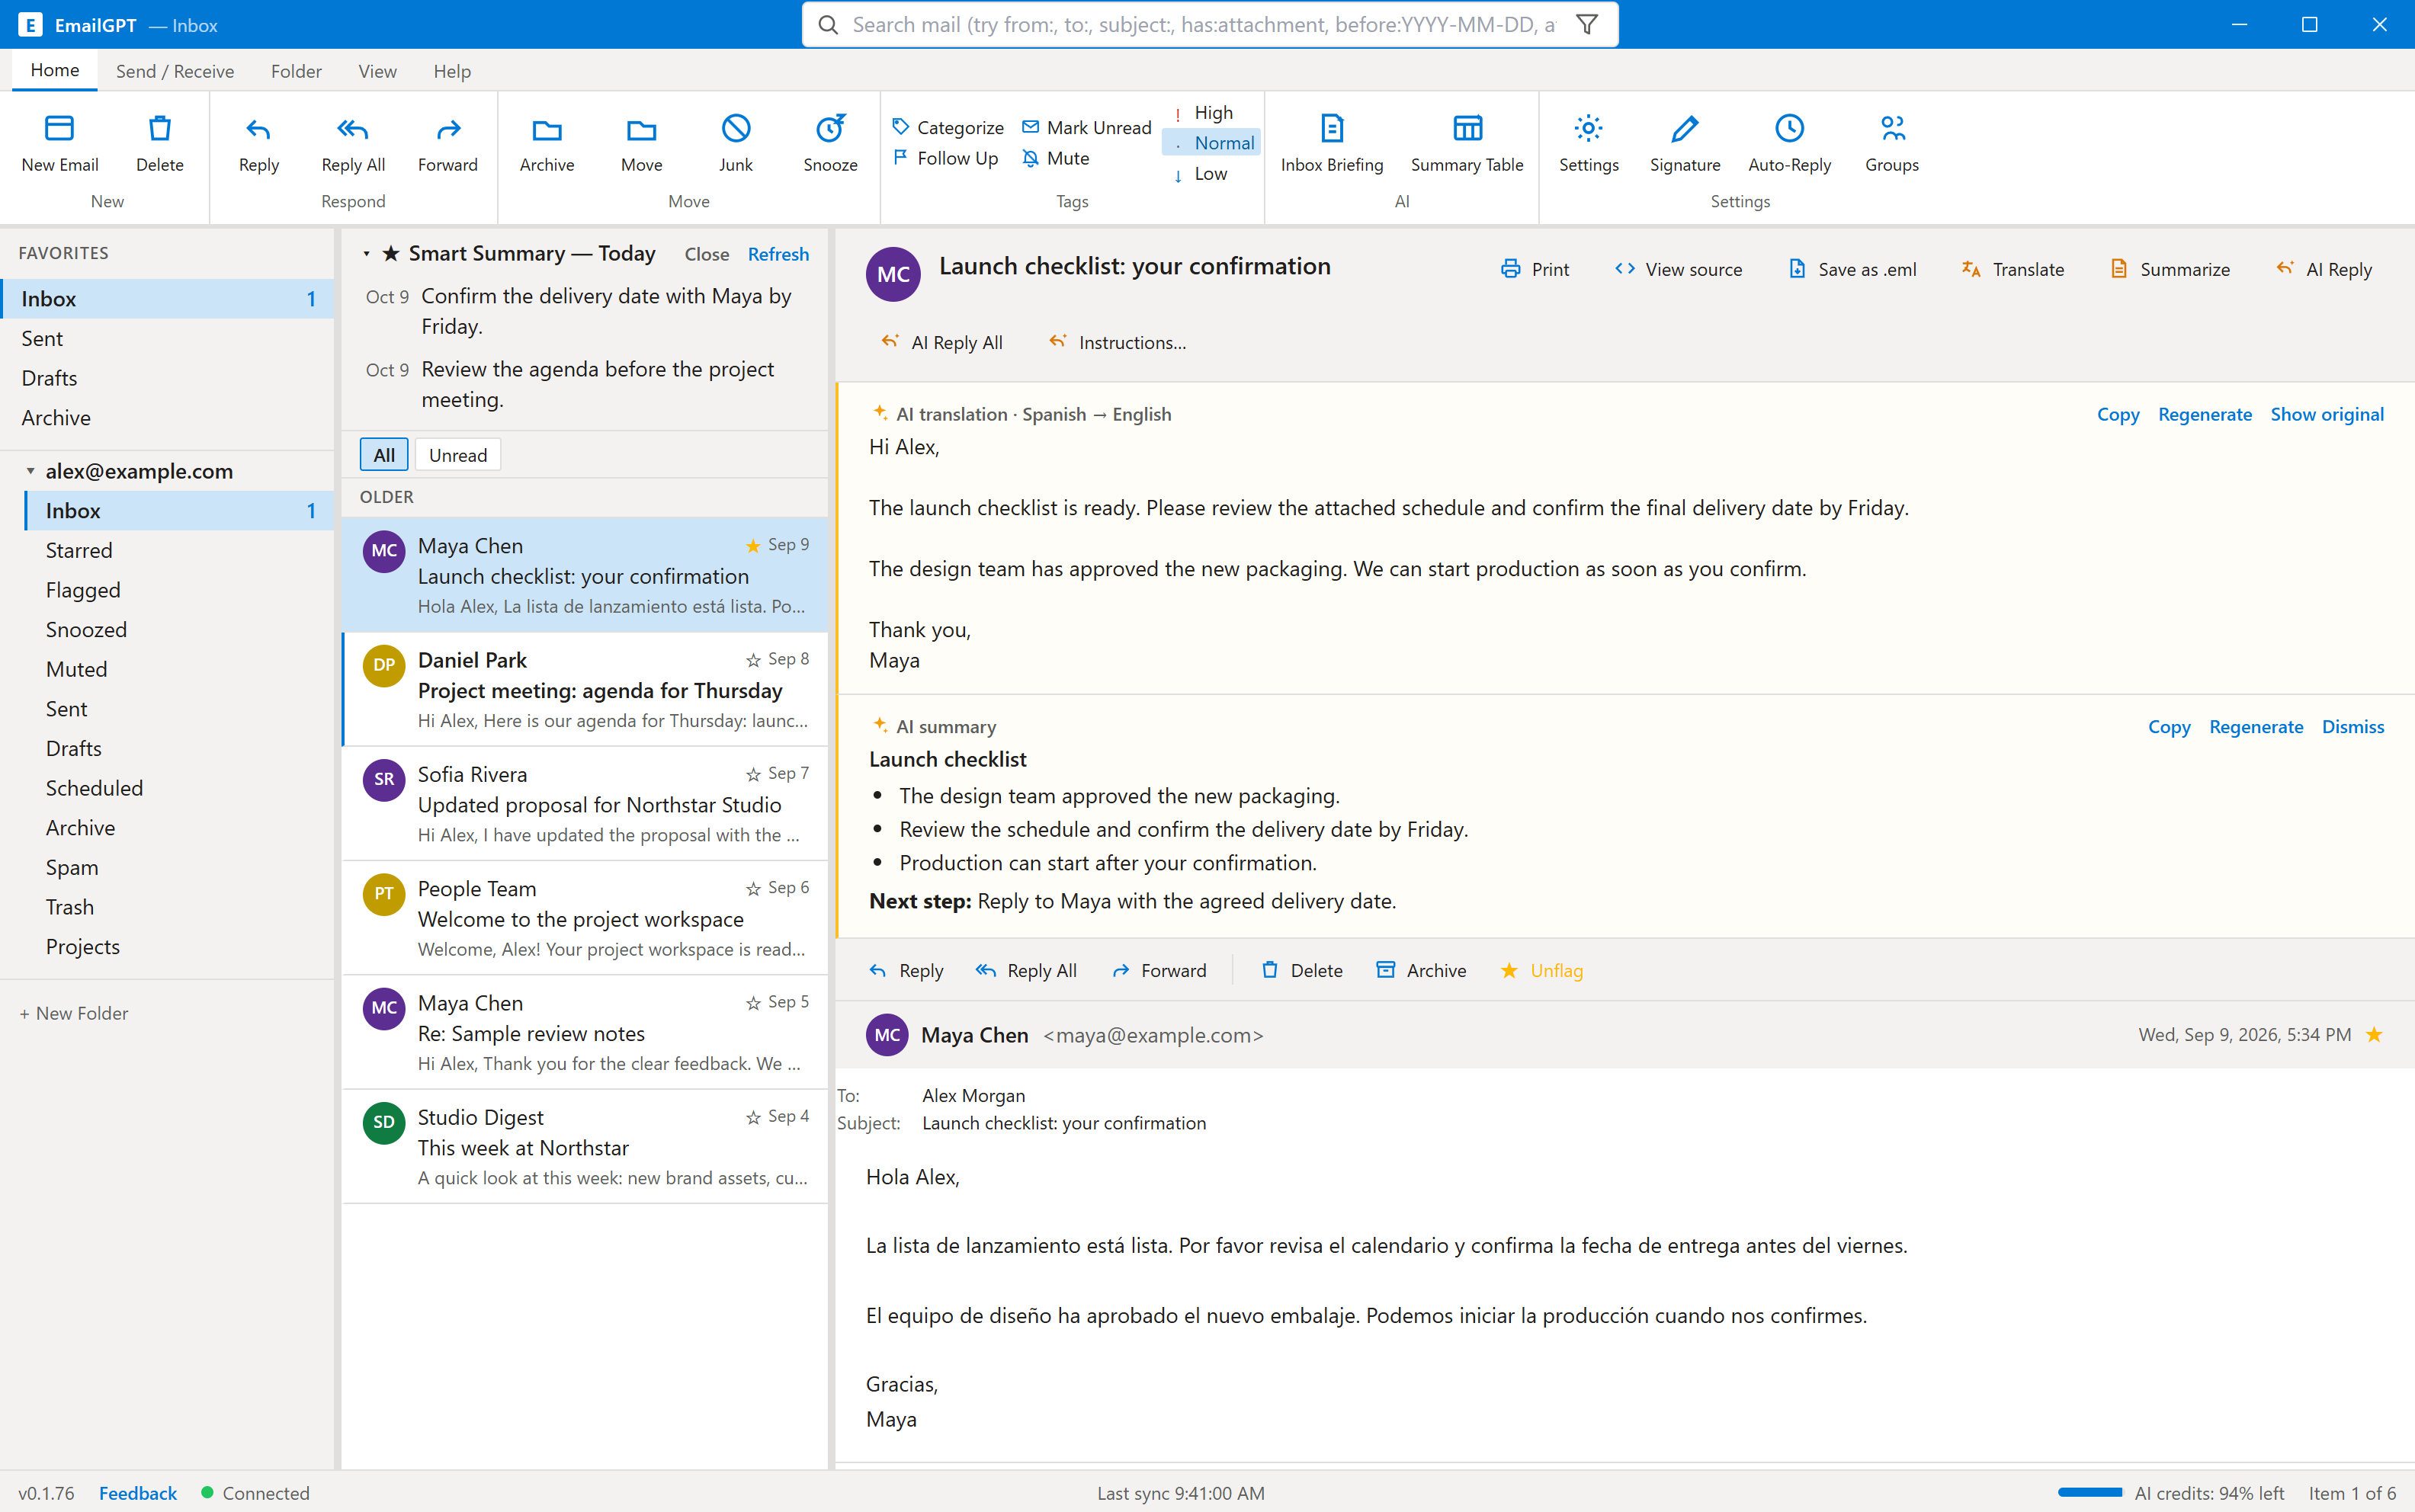
  1. Open a message and choose Summarize for its key points and next steps.
  2. Use Inbox Briefing to open the Smart Summary panel. Select an item to return to its message.
  3. Use Summary Table when you want a structured overview of the selected correspondence.

Summary and briefing features require Premium access. Always check the original email before making a decision.

AI summary with three key points and a suggested next step; Smart Summary remains visible beside it
Short key points help you return to the source quickly.
05

Start with a draft. Make it yours.

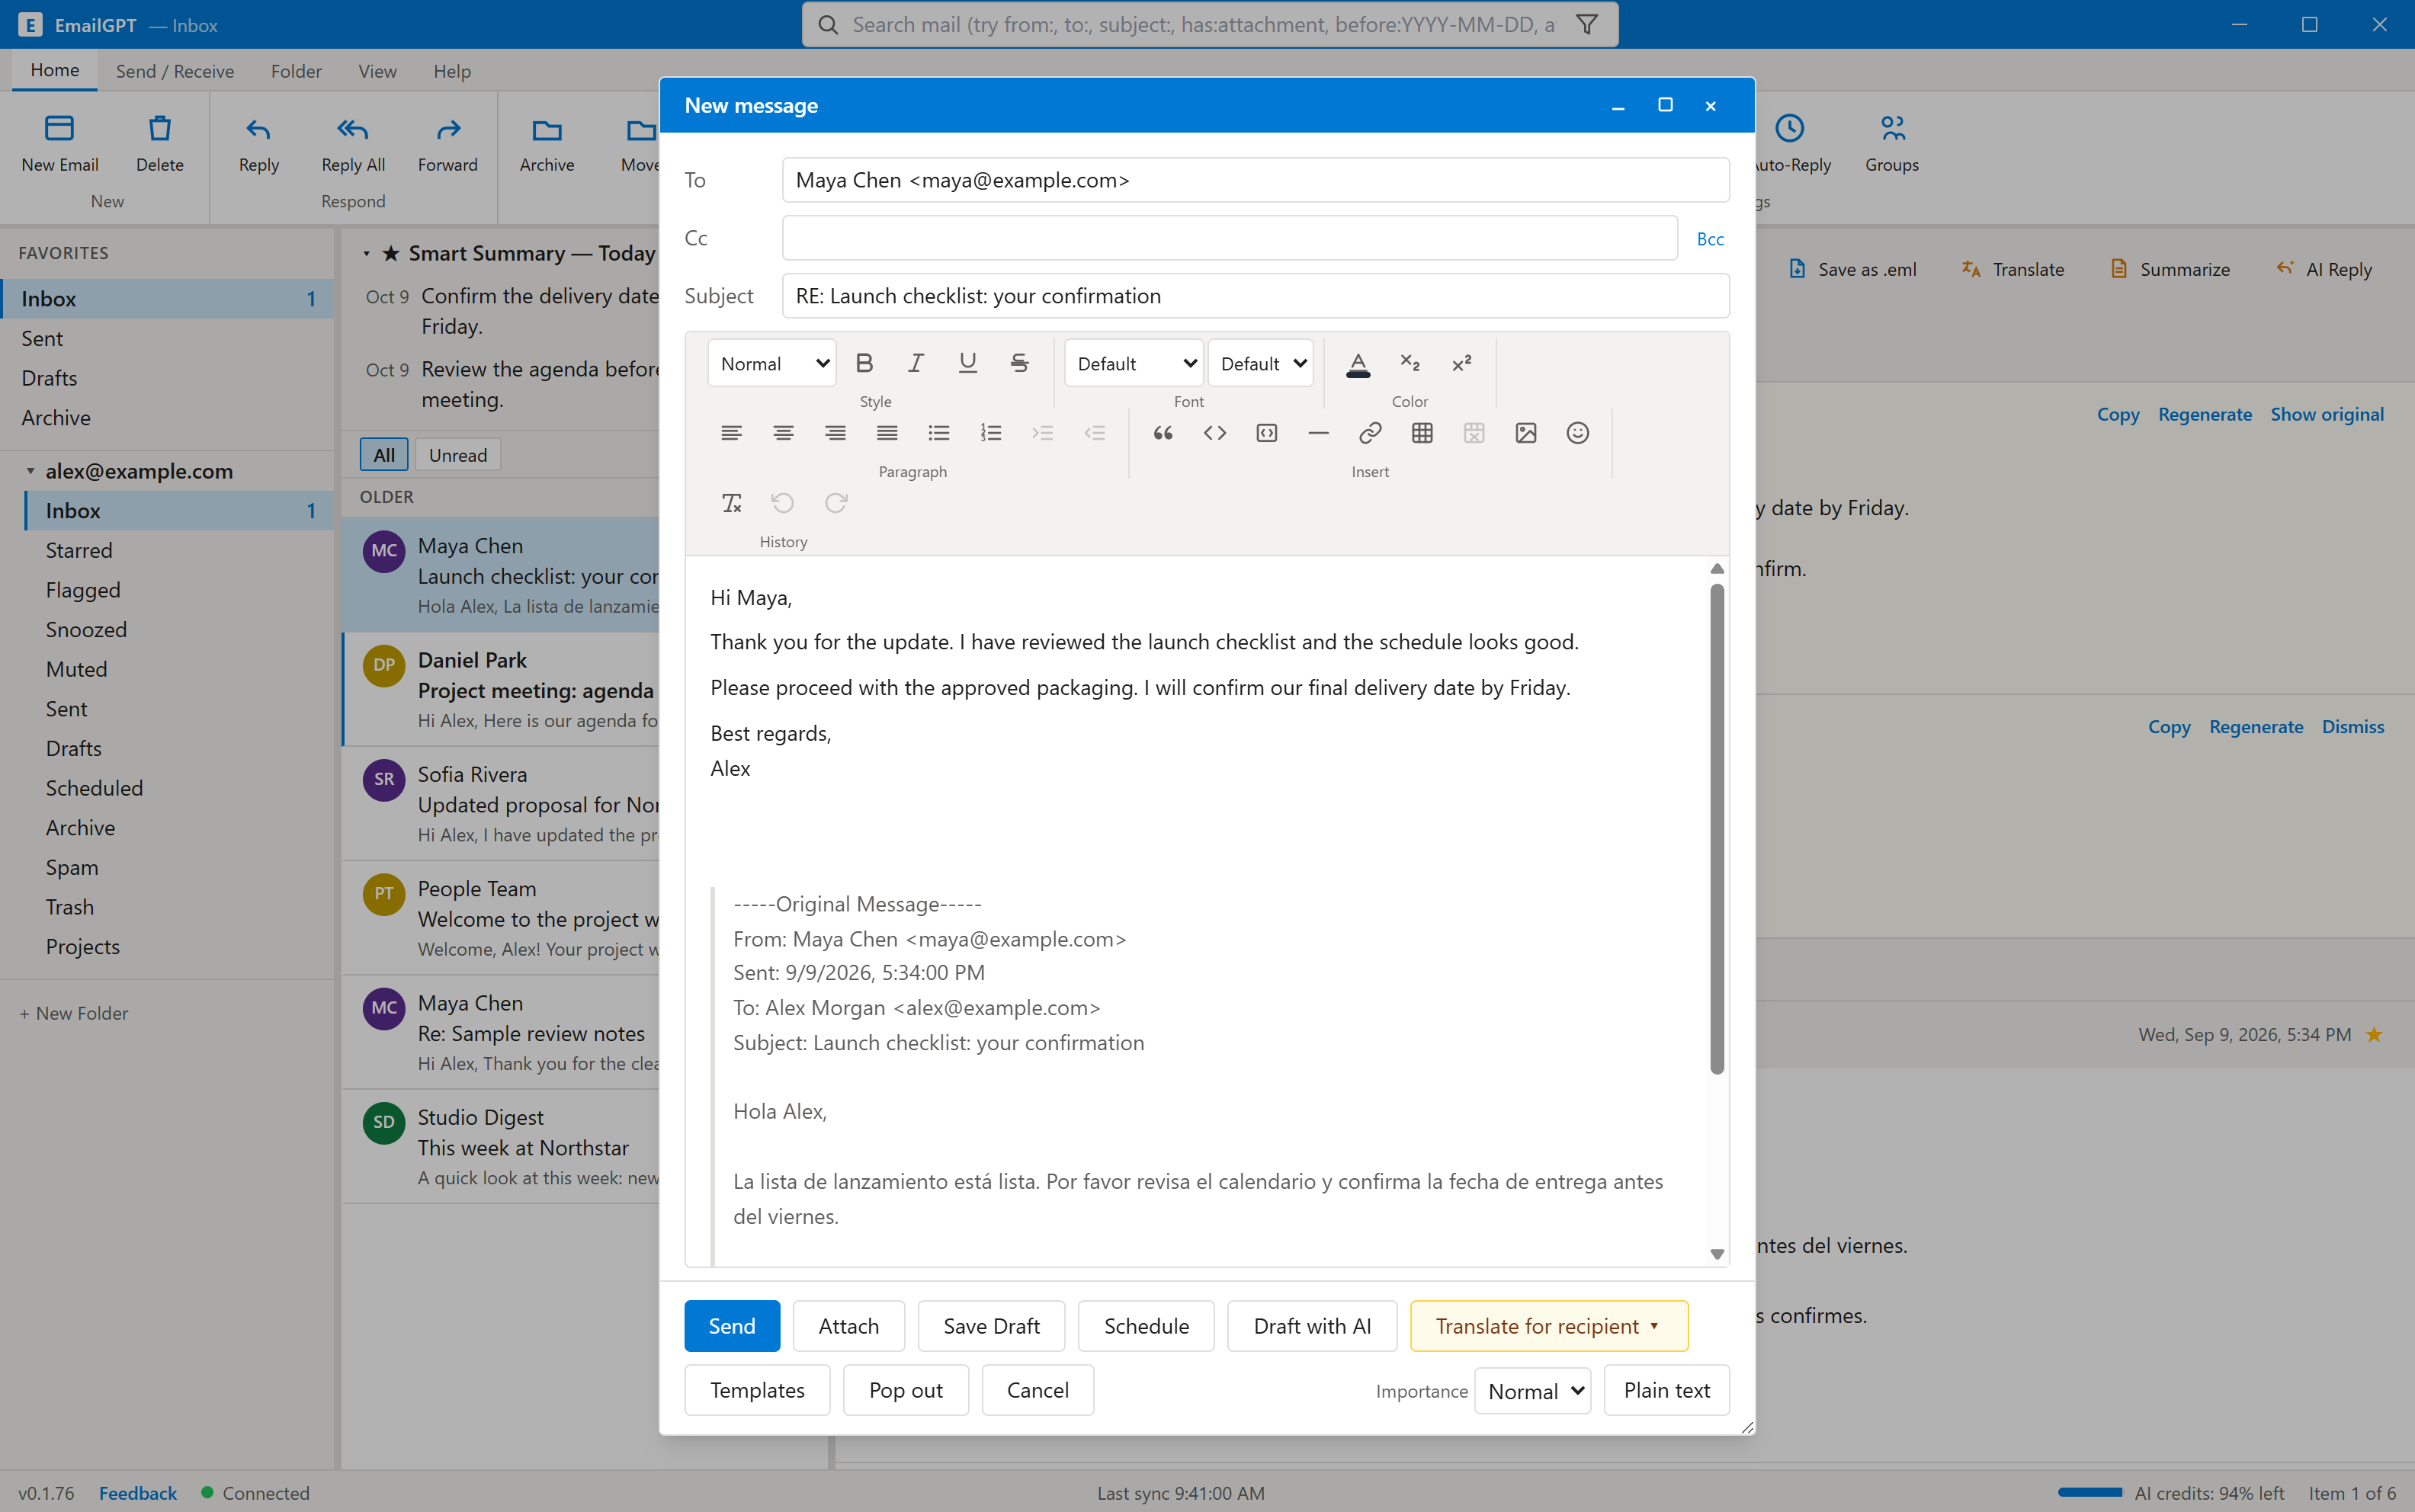
  1. Select AI Reply on the message you want to answer.
  2. Review the recipient, subject and draft. Edit anything that does not match what you want to say.
  3. Use Attach for files, or Save Draft to return later. Draft with AI helps write from your instructions.
  4. Use Translate for recipient if needed, review the result, then choose Send when you are ready.

Check Reply All recipients carefully. AI prepares text; you remain responsible for the message you send.

An editable AI reply addressed to Maya, with Attach, Save Draft, Translate for recipient and Send controls
The draft opens in the normal editor, ready for your review.
07

Know what your plan covers

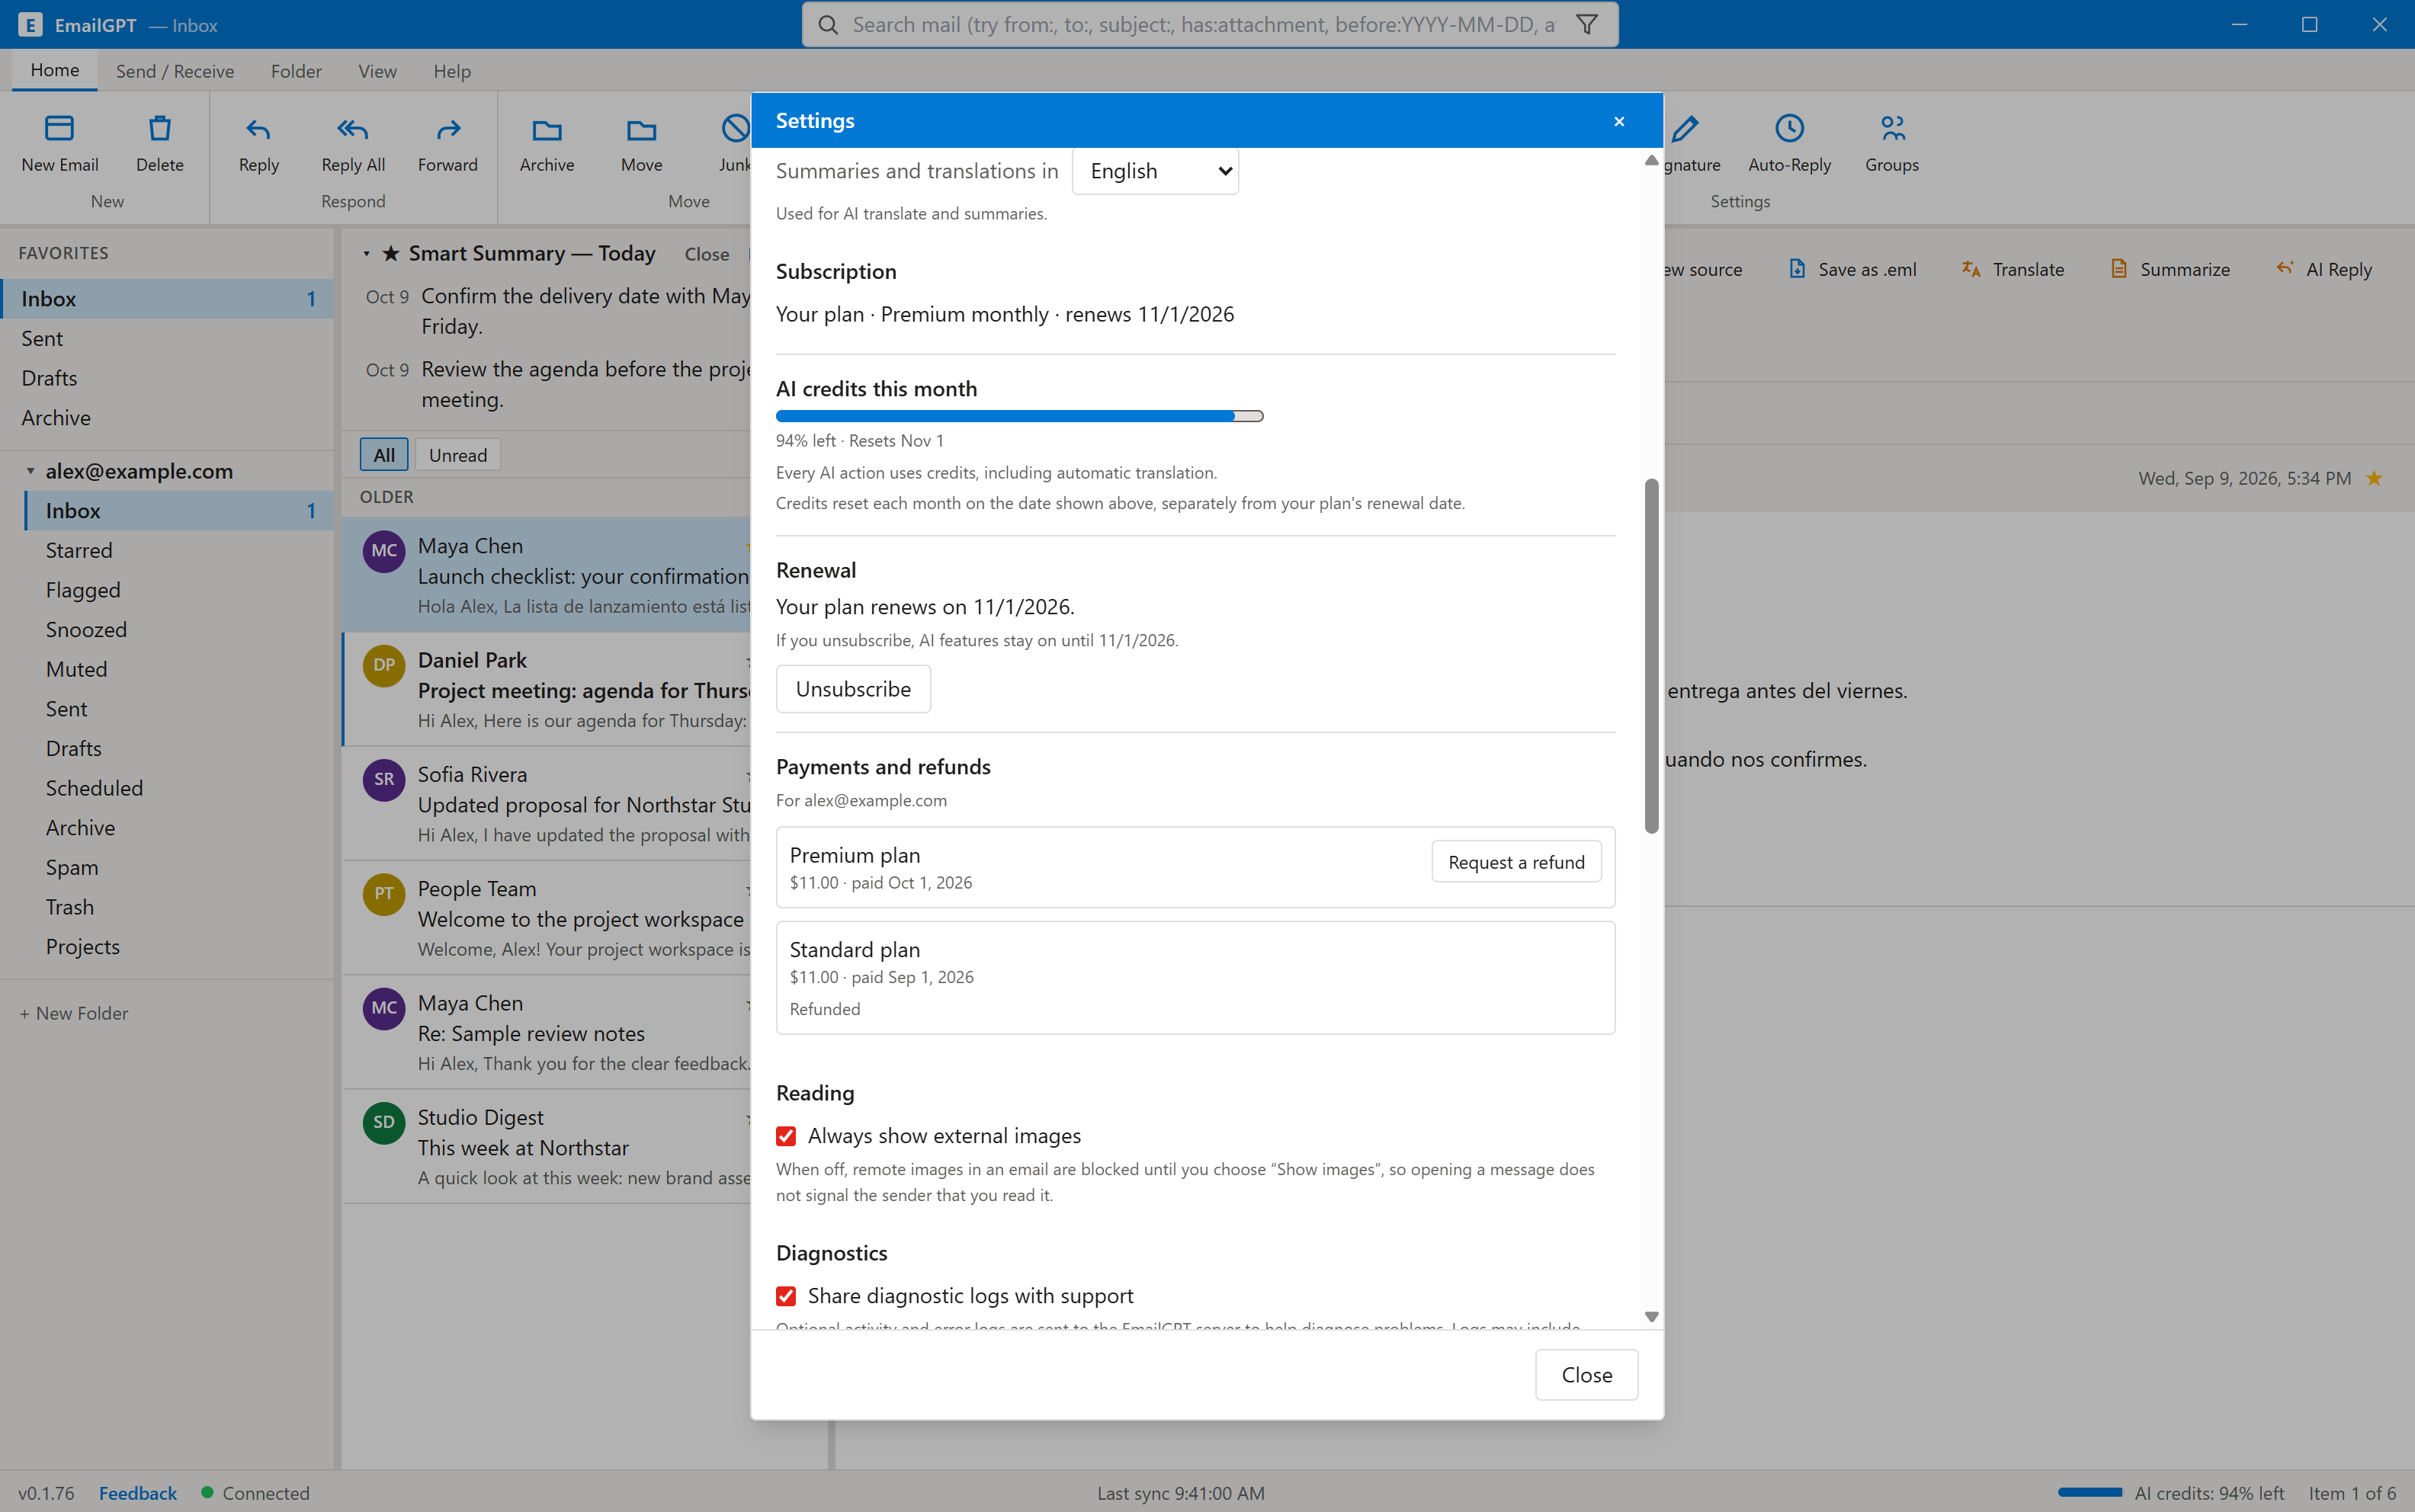
  1. Open Settings and scroll to Subscription.
  2. Check the plan attached to the current mailbox and its renewal information.
  3. AI credits this month shows the percentage of your allowance remaining. It is not a cash balance.
  4. Use the available Subscribe or Update plan action to see current options on the plan page. Company seats may be managed by your administrator.

The allowance reset date and subscription renewal date are separate. Check the dates shown in your app.

Subscription settings showing Premium access, remaining AI credits, renewal and payments
Demonstration data only. Prices and dates in this image are examples.
08

Stop the next renewal

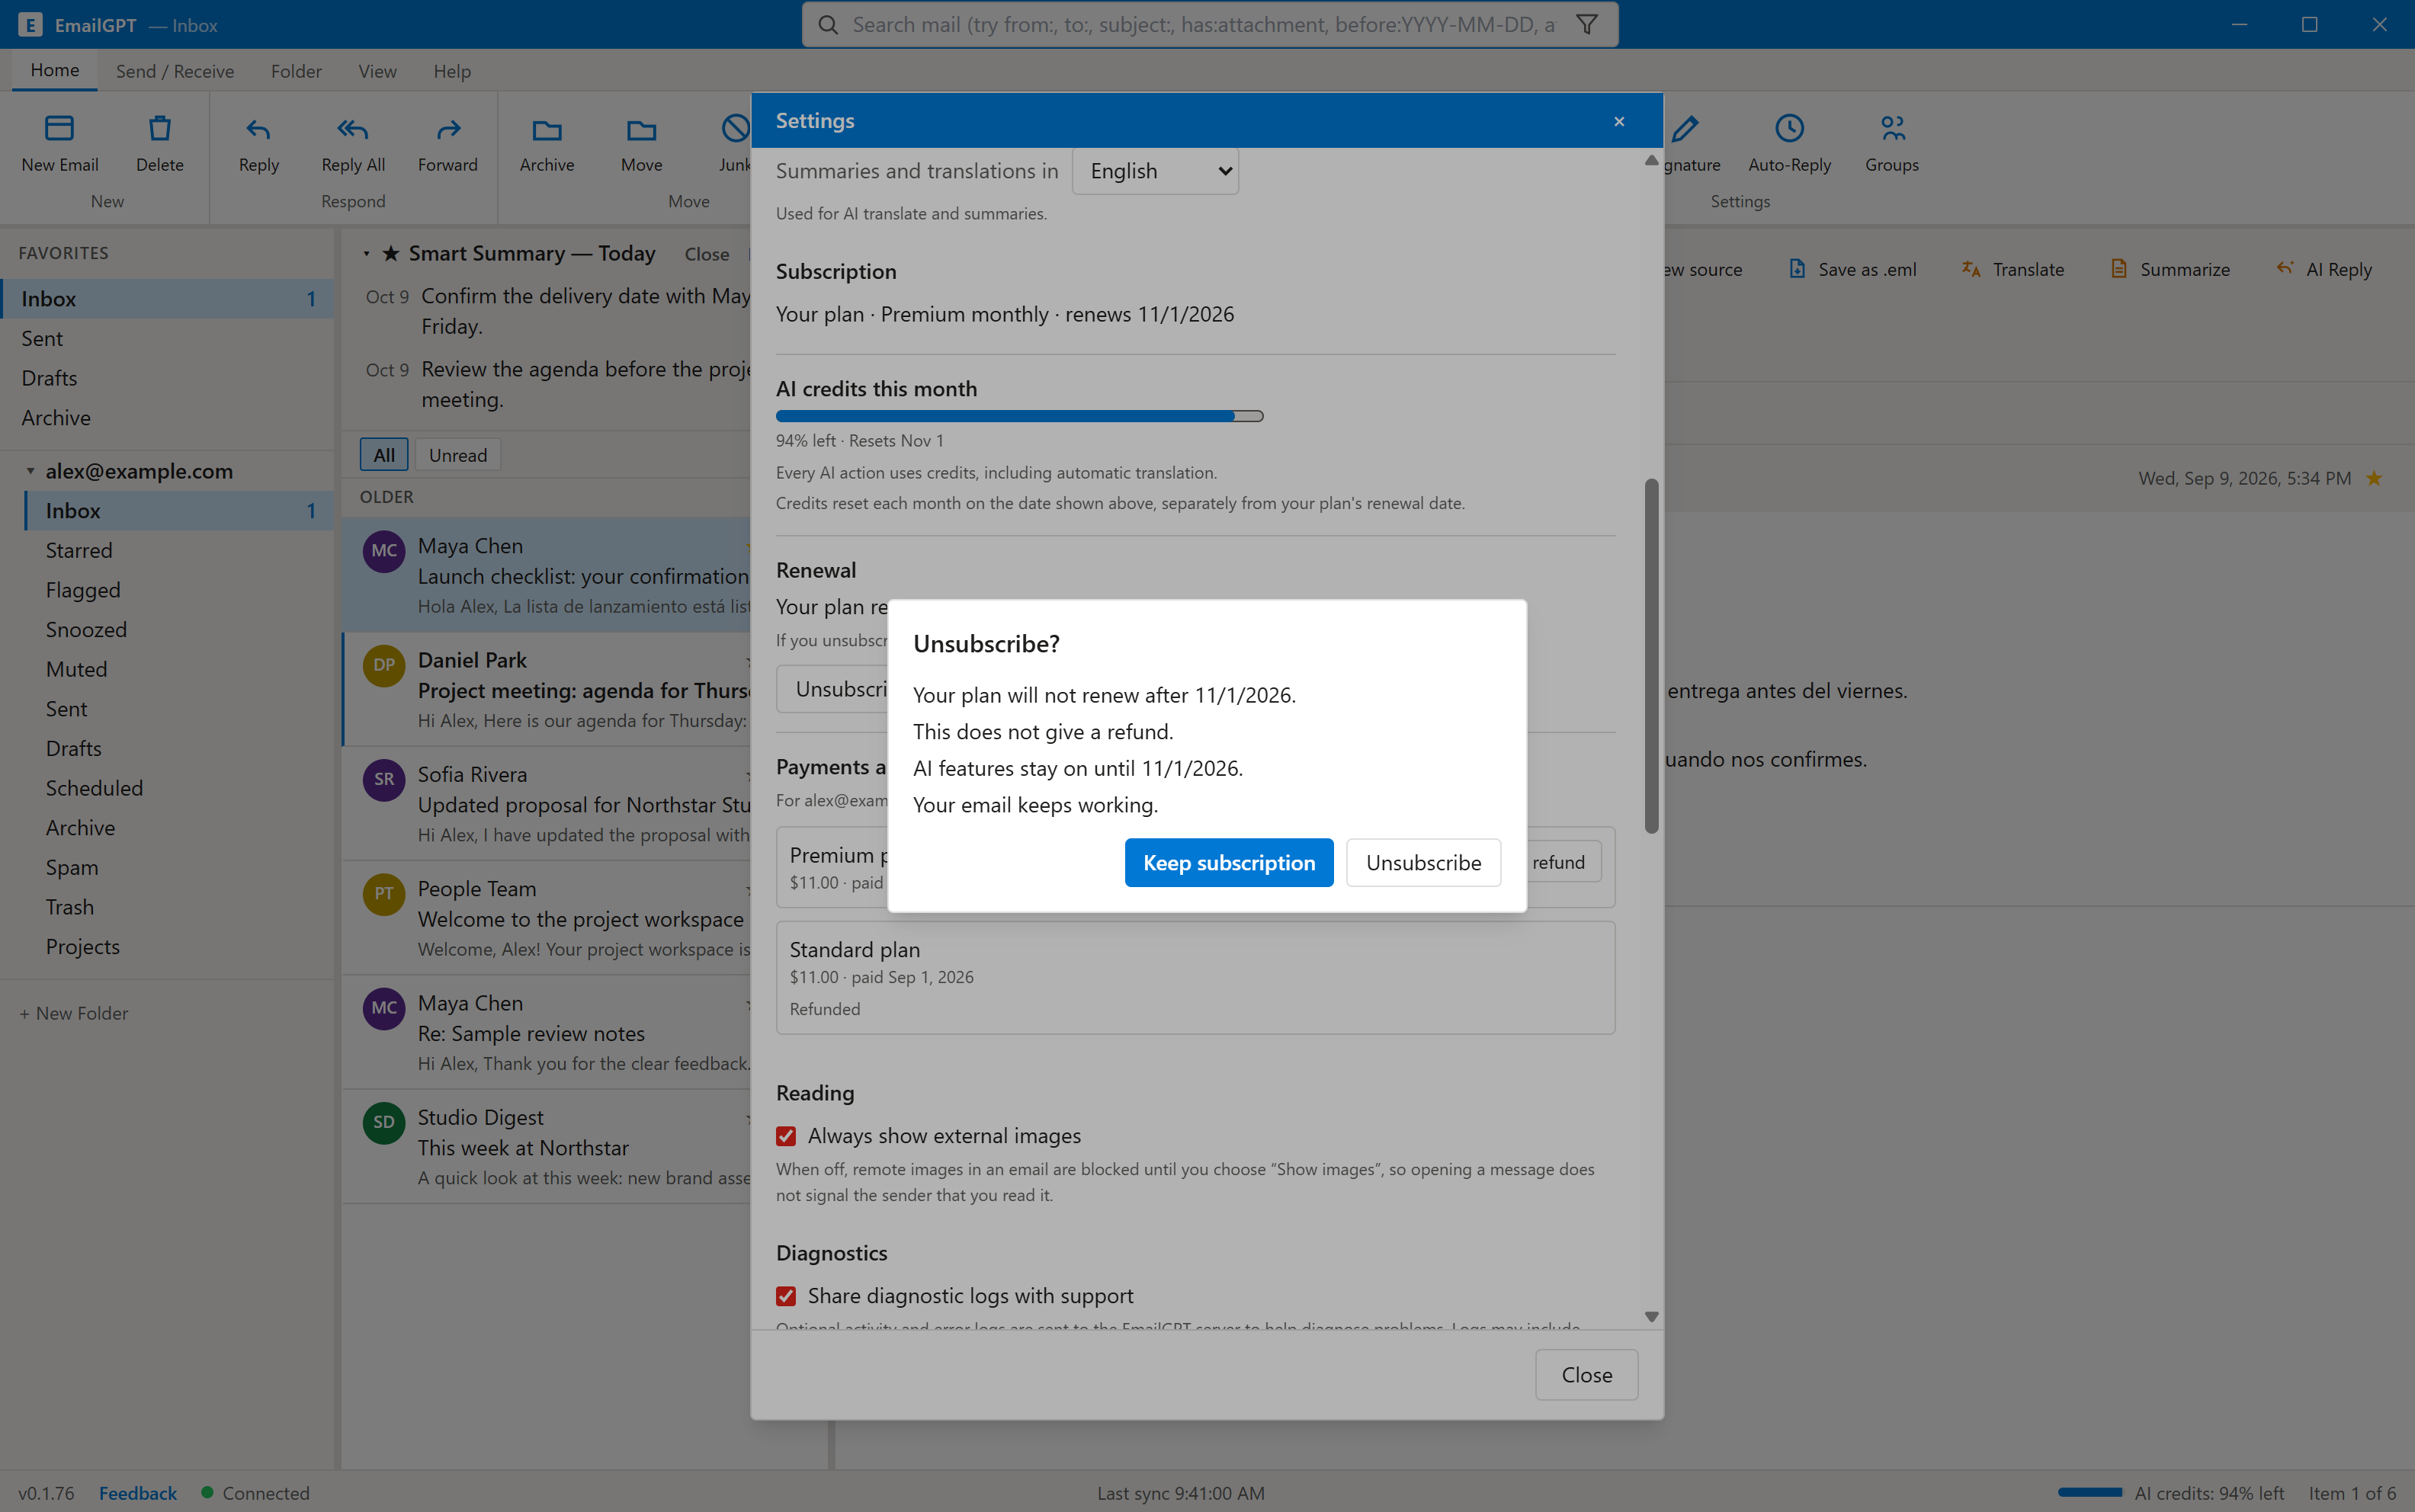
  1. In Settings → Subscription → Renewal, choose Unsubscribe when available.
  2. Read the confirmation, including the date your current AI access ends.
  3. Confirm Unsubscribe only if you want to stop renewal. Otherwise choose Keep subscription.

Unsubscribe does not request a refund. Your email keeps working; the app shows when paid AI access ends.

Unsubscribe confirmation explaining the end date, continued email access and separate refund process
Read the date and confirm the action you intend.
09

Request a payment review

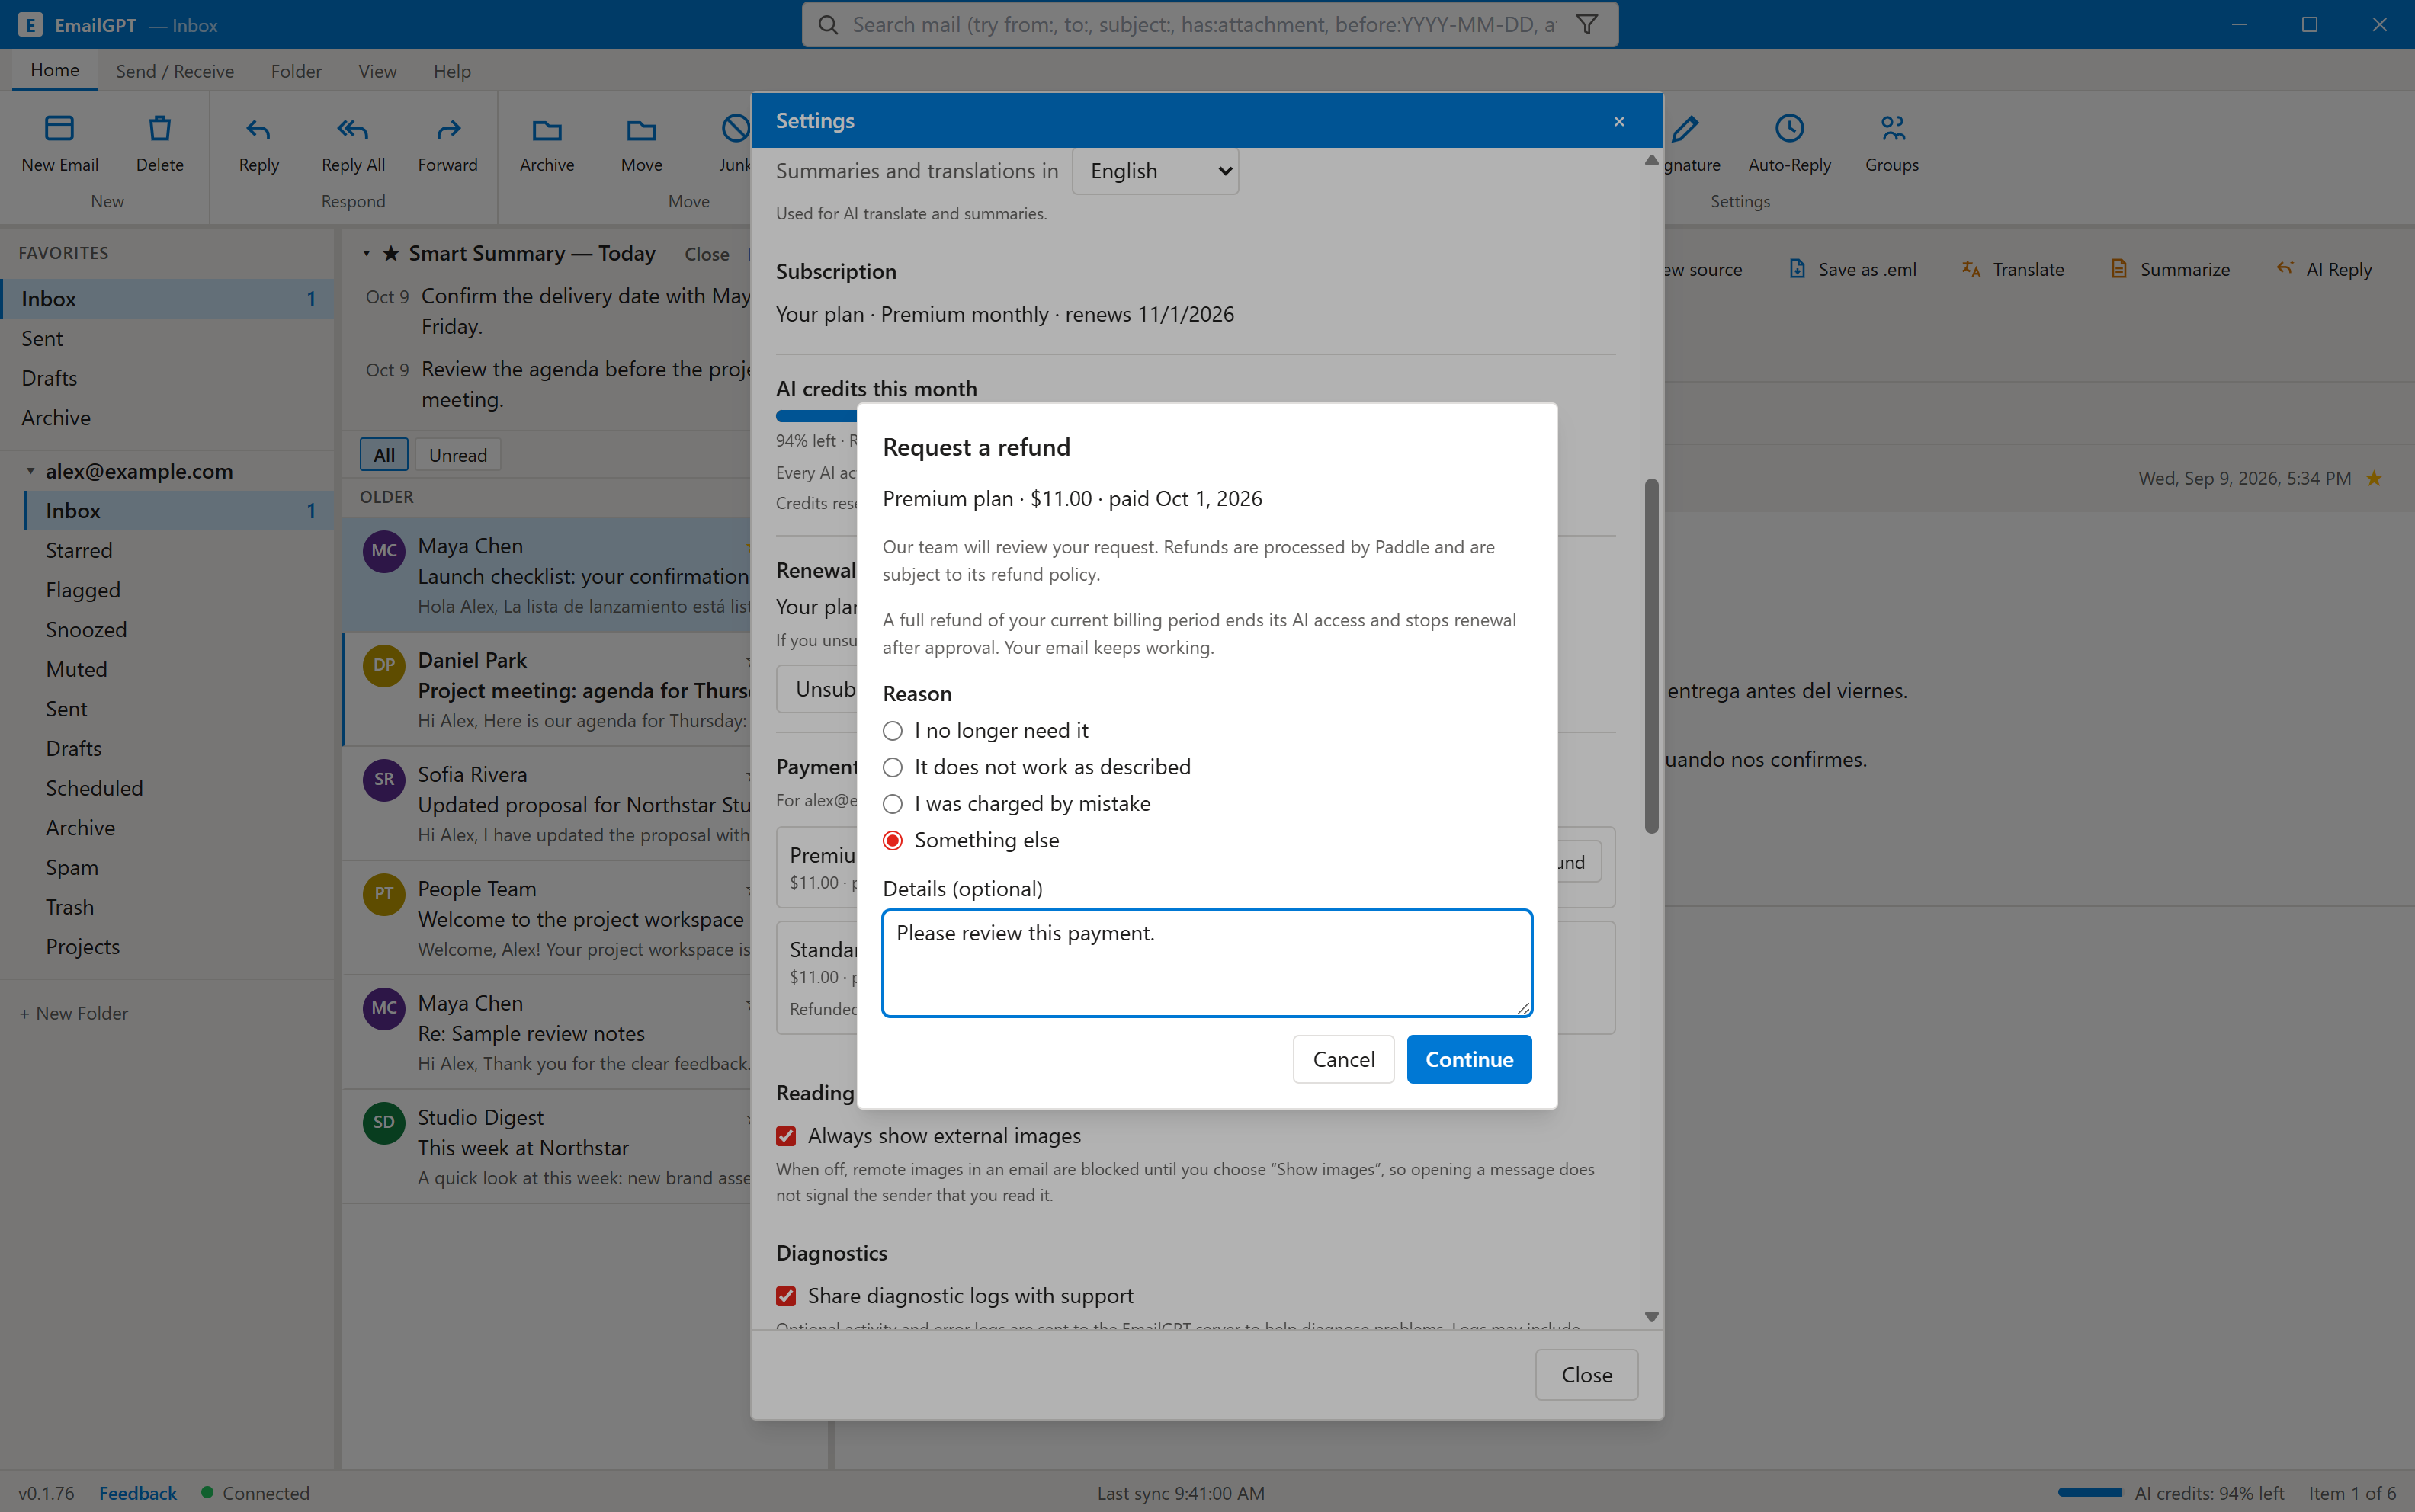
  1. Under Payments and refunds, find the relevant payment.
  2. Select Request a refund, choose a reason and add useful details.
  3. Continue to review your request before submitting it. Return to this section to check its status.

A request is reviewed; submission is not approval. An approved full refund of the current period ends that period's AI access and stops renewal. Your email keeps working.

Refund request form with reasons, optional details and a Continue button
Choose the correct payment and explain your request.
10

Tell us where you got stuck

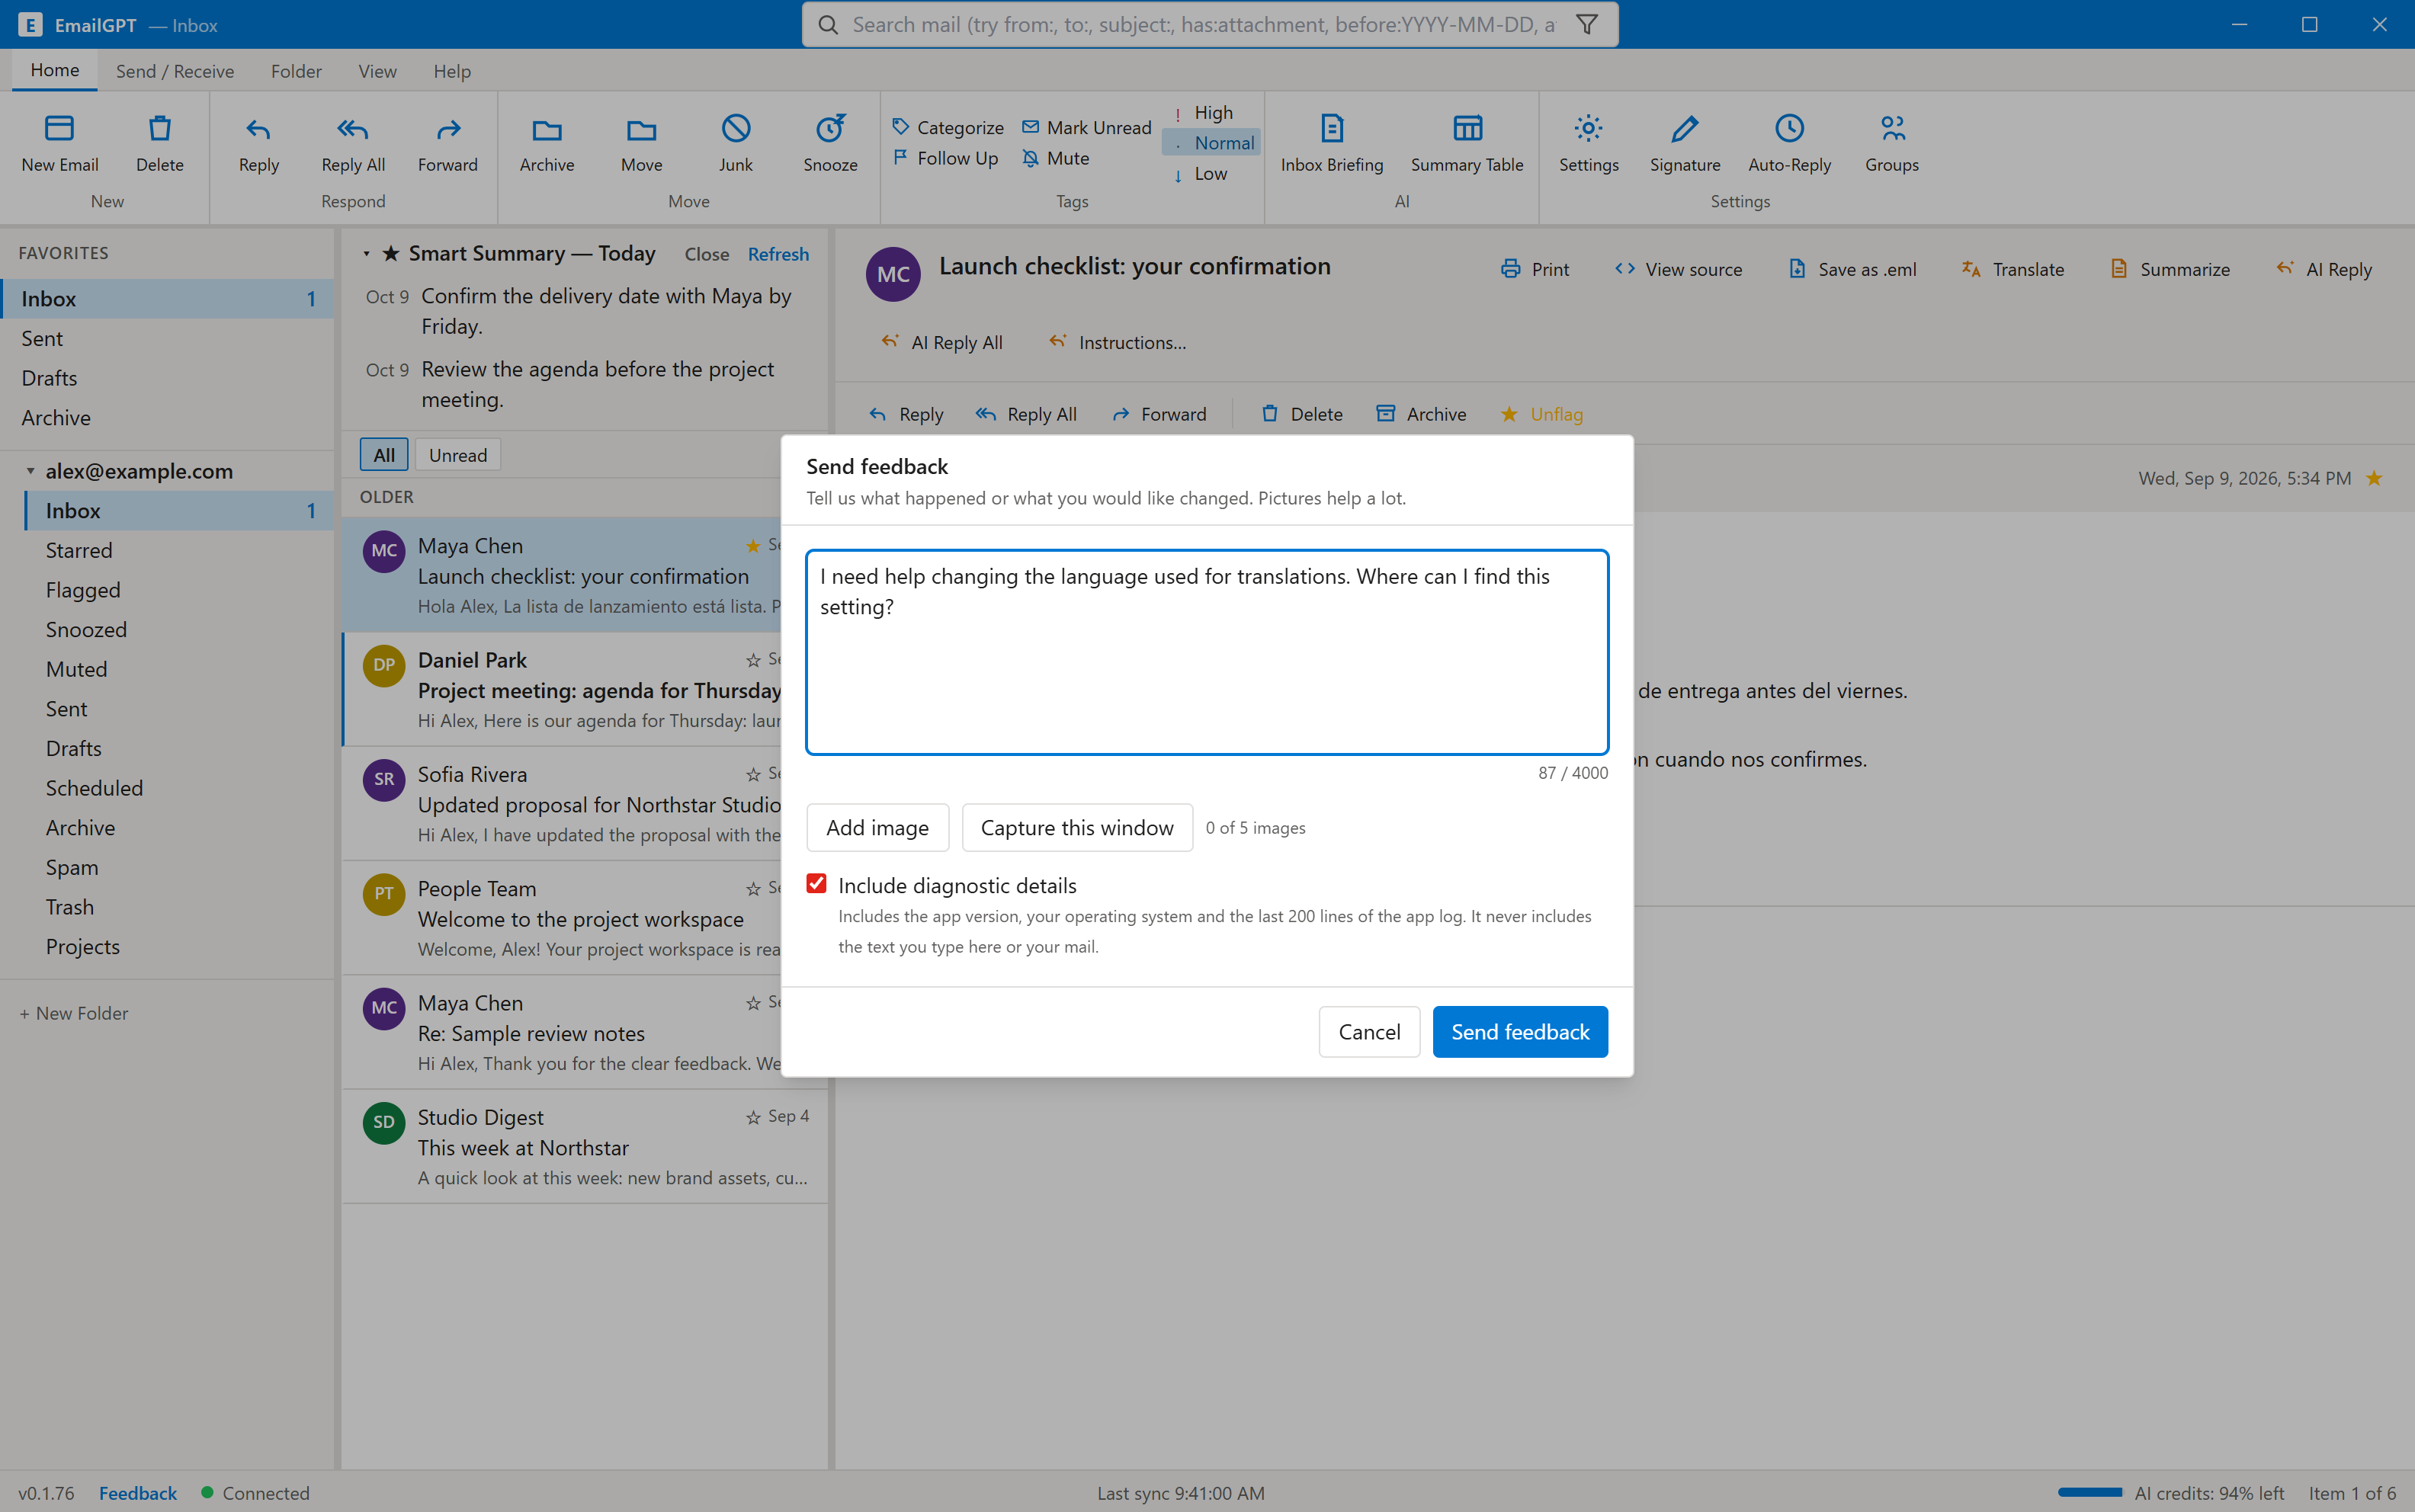
  1. Select Feedback at the bottom of the app, or Send feedback in Settings.
  2. Describe what you tried, what you expected and what happened.
  3. Add an image or capture the app window if it helps. Review the image and optional diagnostic details before sending.
  4. Select Send feedback when your report is ready.

Keep passwords, payment details and private email content out of your report and screenshots.

Feedback form with a sample help question, image attachment controls and optional diagnostics
A short description and a relevant picture help the support team.

A few useful answers.

Why can I read email but not use an AI feature?

Check the current mailbox's Subscription section. The feature may require an active plan, a company seat, Premium access or available AI credits. Follow the explanation shown by the app.

Where do I change the translation language?

Open Settings and find AI language. This setting is used for AI translation and summaries. Translate for recipient in the message editor is a separate action for the message you are writing.

Why can I not find an older message?

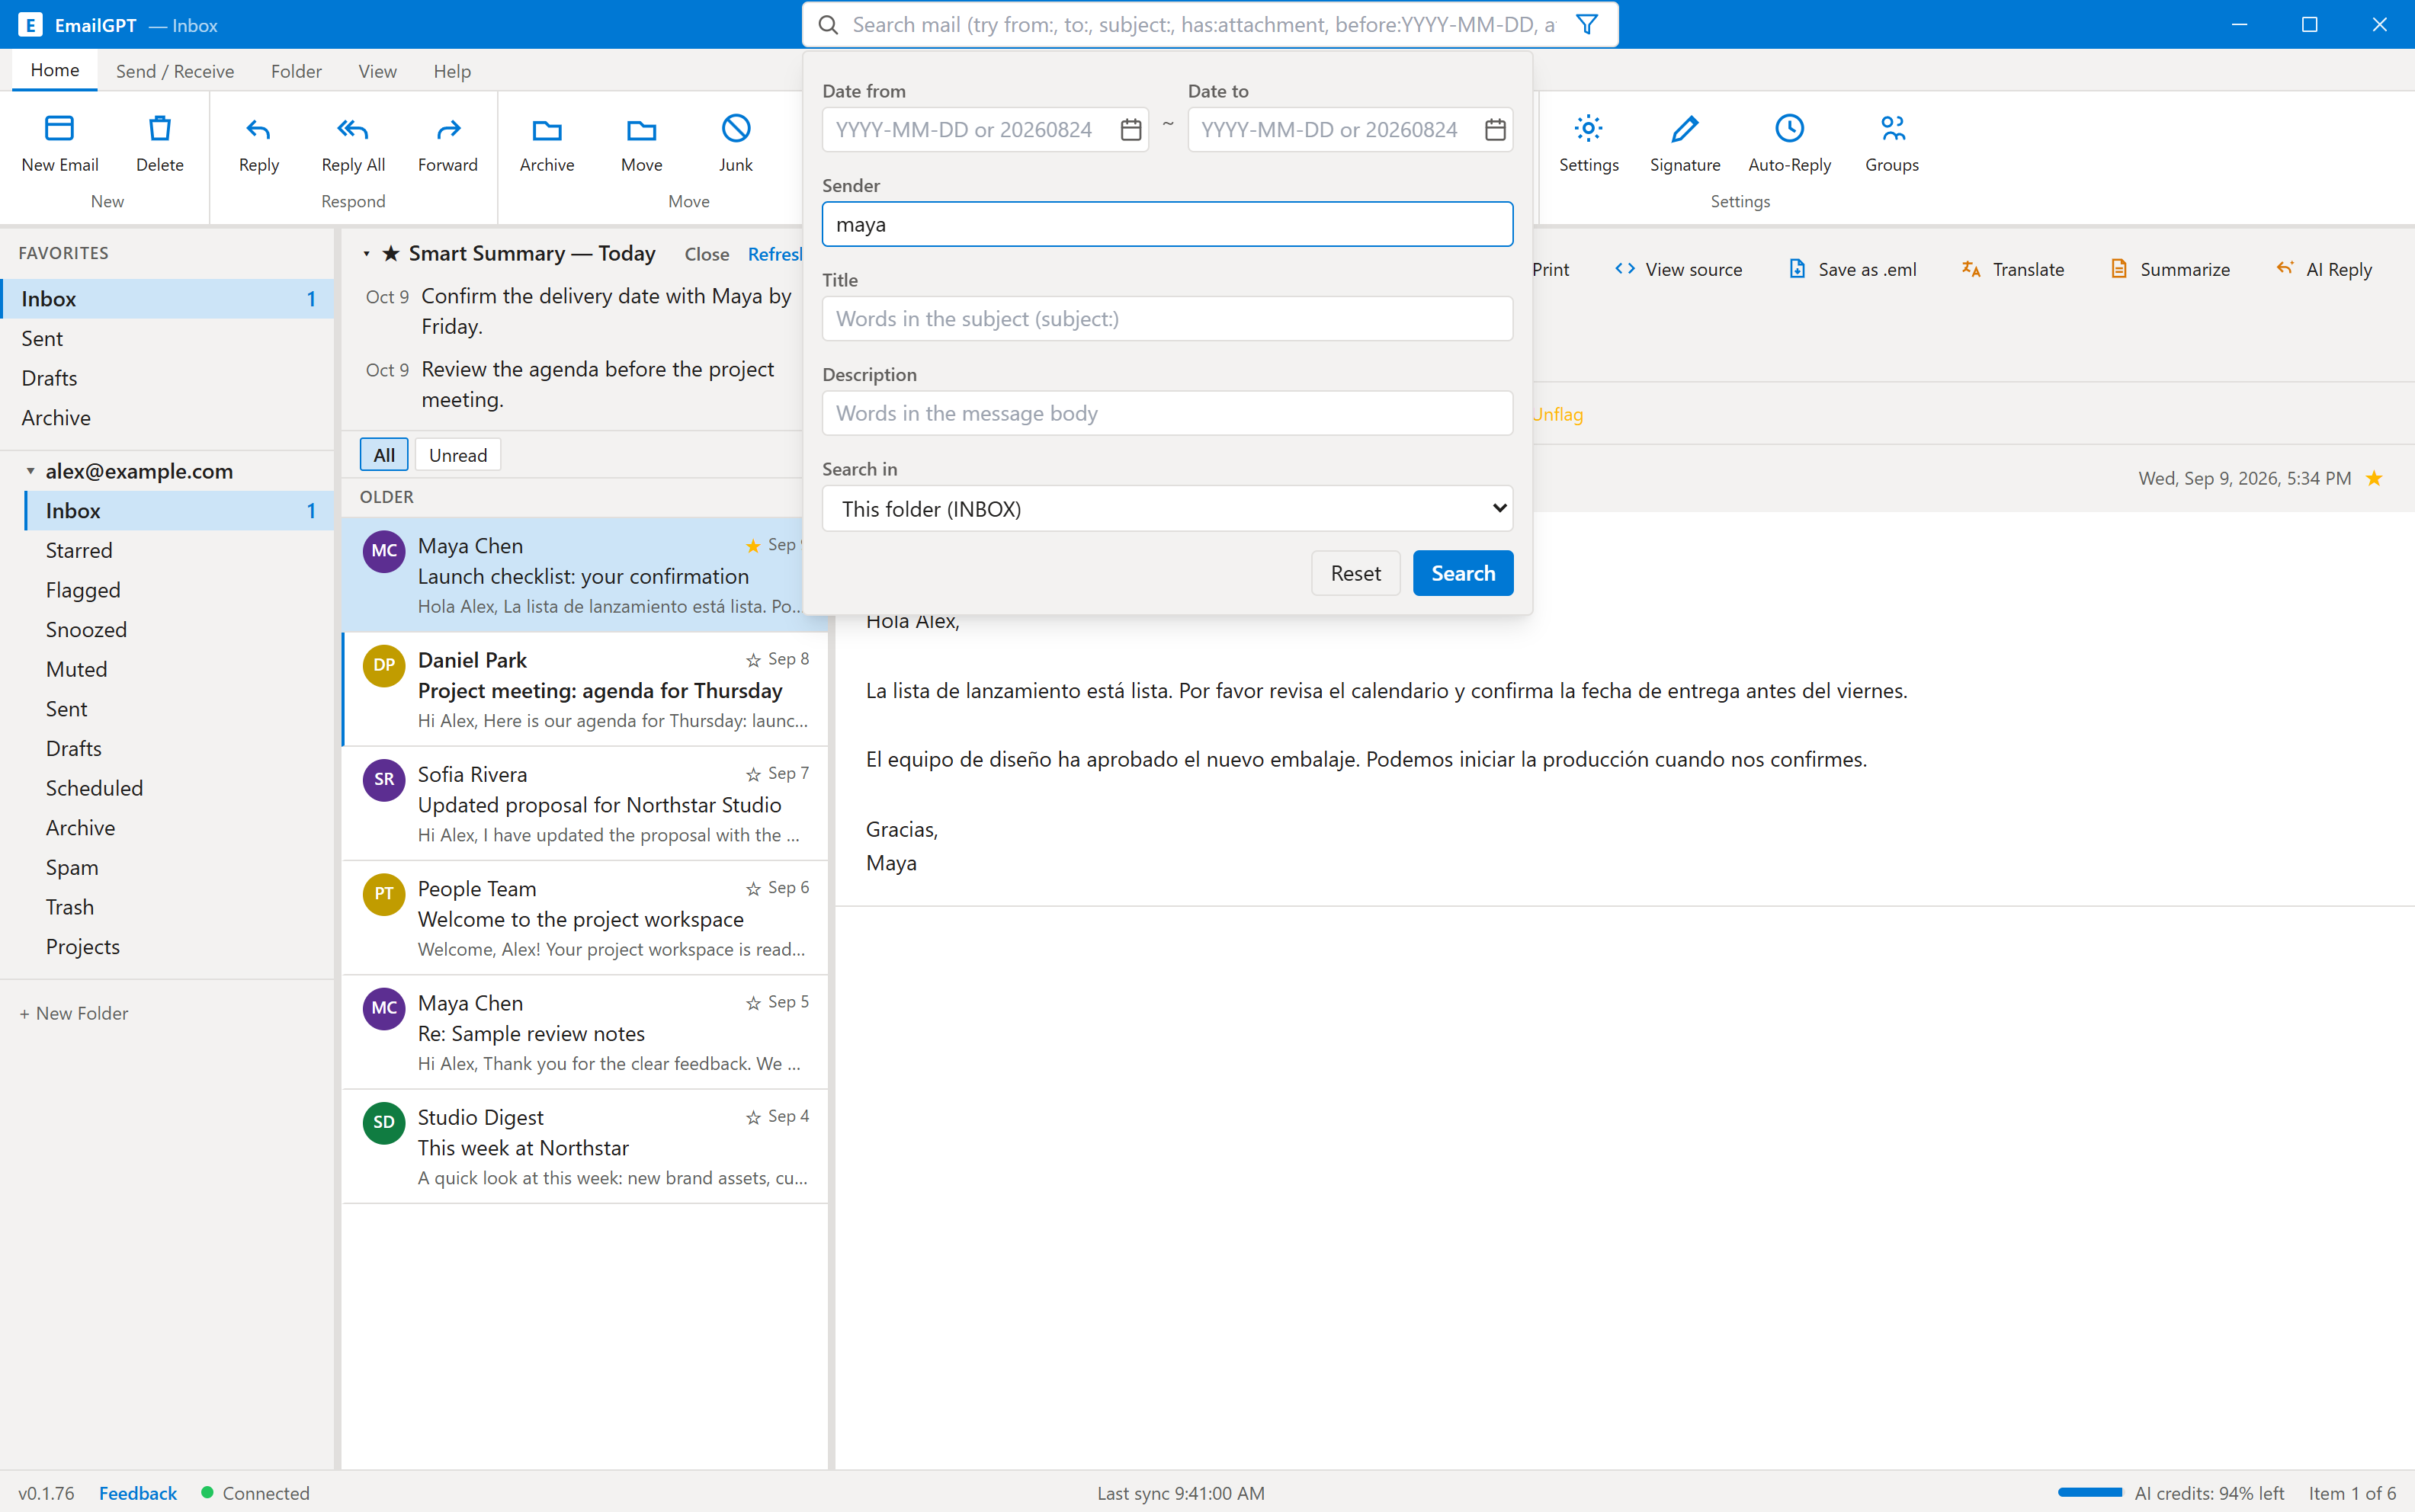
Check the selected mailbox, folder and search scope. Settings → Sync window controls how much older mail the app downloads. A first sync or a wider sync window can take time.

Does Unsubscribe refund my payment?

No. Unsubscribe stops renewal. To request a refund, select the relevant payment in Payments and refunds and follow the review process.

Is this the Android guide?

This walkthrough shows the Windows desktop app. Android screens and purchase options can differ. Do not expect every desktop button to be present in the mobile app.

Your next reply is waiting.

Open EmailGPT and try one step with a message you know.

Back to the walkthrough